Migrating Databases to AWS: A Deep Dive into AWS DMS
.png)
Introduction
Moving legacy or on-premises databases into the cloud is a major challenge for many organizations. Cloud architects and DevOps teams worry about downtime, compatibility, and data consistency during migration. AWS offers Database Migration Service (DMS) to simplify this process. AWS DMS is a fully managed service that helps you move data to the AWS Cloud easily and securely. By automating the heavy lifting of data extraction, load, and change tracking, DMS lets teams focus on their applications instead of manual data transfer. In practice, DMS supports both one-time migrations and ongoing replication (using Change Data Capture) to minimize downtime. This guide walks through what AWS DMS is, how it works, pricing, and best practices, with concrete examples and links to the AWS DMS documentation.
What Is AWS DMS?

AWS Database Migration Service (AWS DMS) is an AWS-managed service for copying data between databases. In plain English, AWS DMS connects a “source” database to a “target” database and moves the data for you. You configure a replication instance (an AWS-hosted server) plus source and target endpoints (connection info). DMS then reads data from the source and applies it to the target. Critically, at least one of the endpoints must be in AWS (you can’t use DMS to migrate directly from one on-prem database to another). DMS handles homogeneous migrations (same engine to same engine) and heterogeneous migrations (e.g. Oracle to PostgreSQL).
Once you set it up, a DMS migration task performs the work. A task can do a one-time full data load, then switch to Change Data Capture (CDC) mode to apply ongoing changes, or it can do only one of those. By default, AWS DMS will move existing records (the “full load”) and then keep the target in sync by continuously applying new changes from the source. In effect, DMS helps you do an initial bulk copy and then switch to real-time replication, so cutover downtime is minimal.
The DMS replication instance sits in your VPC and runs the show. You register a source endpoint that points to your existing database—on-premises or Amazon RDS—and a target endpoint for the destination (another RDS instance, an Aurora cluster, or even a database on EC2). With those in place, you create a replication task that tells DMS which tables to copy and whether to turn on Change Data Capture (CDC).
When the task starts, DMS bulk-loads the selected data, then automatically switches to CDC, streaming every new insert, update, or delete it finds in the source’s transaction logs. Your target stays in near-real-time sync, all with minimal manual effort.
Why & When to Use It

AWS DMS is commonly used for cloud migration and replication scenarios. For example, you might need to rehost a legacy on-premises database on AWS RDS, or replatform from one database engine to another (e.g. Oracle→Amazon Aurora). DMS also works for cloud-to-cloud moves (e.g. between AWS regions or accounts) or consolidating databases into managed services. Typical scenarios include:
- Lift-and-shift migrations. Move an on-prem or EC2-hosted database into Amazon RDS/Aurora to retire data centers or cut licensing costs.
- Modernization (heterogeneous migrations). Switch engines (e.g. SQL Server → PostgreSQL) using AWS Schema Conversion Tool (SCT) for code plus DMS for data.
- Disaster recovery and replication. Continuously replicate data (using CDC) to a standby database in another region or account for high availability or audit.
- Cloud data lakes. Export relational data to analytics targets (like Amazon S3, Redshift, or Kinesis) for reporting. DMS can replicate into S3/Redshift to feed data lakes or BI pipelines.
A major strength of DMS is its CDC (Change Data Capture) capability. Instead of taking a database offline, you can do a background load and then switch on CDC to capture live updates. As AWS notes, DMS “uses change data capture to keep the source and target in sync and to minimize downtime”. In practice, this means you can migrate a production database in phases: first copy existing rows, then let DMS stream new commits in near-real time. When you finally flip the application over, the target is already current.
Real-world example: Imagine an ecommerce company migrating a MySQL OLTP database to Amazon RDS for MySQL. They set up DMS to perform a full load of all tables over a weekend. Once that completes, DMS switches to ongoing replication (CDC) mode to capture all new sales orders and inventory changes. After the final catch-up, they switch the application endpoint to the new RDS instance. The downtime was only the seconds it took to cut over – data stayed in sync thanks to CDC. This illustrates how AWS DMS can greatly shrink migration windows and simplify cloud onboarding.
Key Features & How They Work
AWS DMS includes several core features that make migrations and replication robust and flexible:
Replication Instances

The replication instance is the compute server (an Amazon EC2 under the hood) that runs the DMS software. You must provision an instance in your VPC. DMS offers multiple instance classes (general-purpose, compute-optimized, or memory-optimized) so you can match your workload. For example, T3-class instances (t3.micro, t3.small, t3.medium) work for small proof-of-concepts, while larger jobs might use C4/C5 or R5/R6 series instances. Each instance comes with attached storage (e.g. 50–100 GB of gp2 EBS by default ) for transaction logs and buffering. You can scale the instance up/down as needed, or even choose Multi-AZ deployment for high availability.
You only pay by the hour for the instance and any extra log storage you use. (There’s also a new AWS DMS Serverless mode where you don’t manage an instance – DMS provisions capacity automatically and bills you in 2GB increments of RAM called “Data-Change Units.” For serverless, you pay per DCU-hour.) Importantly, T3 instances run in “unlimited” mode, meaning if CPU usage exceeds baseline, DMS will charge extra CPU credit fees ($0.075 per vCPU-hour). So monitor CPU on T3s to avoid unexpected costs.
Endpoints & Transformation Rules
In DMS terminology, a source endpoint and a target endpoint define the connection details (host, port, credentials) for each database. DMS supports virtually all popular database engines. As a source, you can use Oracle, SQL Server, PostgreSQL, MySQL, MariaDB, MongoDB, SAP ASE (Sybase), and others. As a target, you can also migrate into these engines plus Amazon Redshift, S3, DynamoDB, Kinesis, and more (consult the AWS DMS documentation for a full list). (Note: DMS does not support cross-region migration when using DynamoDB, OpenSearch Service, or Kinesis as targets.)
While migrating, DMS does data movement, but it does not automatically rename or modify tables/columns for you. You can optionally add transformation rules in your task to adjust schemas. For instance, you can rename a schema or table, map one database to another, drop a column, or change data types on the fly. These are specified as transformation actions in the table mapping rules. As AWS describes it, “you use the transformation actions to specify any transformations you want to apply to the selected schema, table, or view”. (Rules are optional – if you don’t specify any, DMS copies names directly.)
For example, you might use a transformation rule to move all tables from schema old_schema into new_schema, or convert a VARCHAR(10) column to INTEGER. Keep in mind some restrictions: rule names and object names are case-sensitive, and you generally can’t have two rules targeting the exact same object. But with careful mapping rules, you can align source and target schemas as needed without manual SQL changes.
Task Types (Full load, CDC, full + CDC)
An AWS DMS task defines how the data should be moved. There are three main modes:
- Full Load: DMS reads all the existing data (tables you select) from the source and writes it to the target. This is like a bulk copy. During a full load, DMS will load tables in parallel (by default up to 8 tables at a time). After loading each table, DMS can then catch up on any changes that occurred during that load.
- Ongoing Replication (CDC): DMS reads changes (inserts, updates, deletes) from the source’s transaction log or equivalent and applies them to the target. This phase has no end until you stop the task. CDC is what keeps the target continuously in sync.
- Full Load + CDC: This hybrid mode does the full data copy first, and then switches to CDC. It’s the most common choice for live systems, because you get all the data initially and then keep catching up on new changes.
AWS DMS explains that a task goes through three phases: full load, apply cached changes, and ongoing replication. You can run a task in any one of these modes or chain them together. For example, running only CDC (with no full load) would assume the target already has the data. In a typical migration you’d do “full load + CDC” to minimize downtime: let DMS load the bulk of the data, then keep it synced until you cut over.
Pricing Essentials
Cost Breakdown
AWS DMS charges fall into two primary categories:
- Replication instance hours – you pay for every hour (or partial hour) that your replication instance is running.
- Storage for logs and data – beyond the 100 GB gp2 volume bundled with each instance, DMS bills you for additional storage used by change-data capture logs and snapshots.
Free Tier & On-Demand Pricing
New customers receive a one-year Free Tier allowance for DMS:
- 750 instance-hours per month of a single-AZ, dms.t3.micro instance (≈720 hours).
- In practice, you could run one micro instance continuously for the month at zero compute cost.
- Once you exceed 750 hours—or when your free year expires—on-demand rates apply. You’re billed by the hour for whatever instance class you choose, with no upfront commitments or minimum usage.
Practical Example
- A dms.t3.medium (2 vCPU) typically runs around $0.08 / hour (region-dependent).
- 50 hours of runtime ≈ $4.00.
- A larger instance, such as dms.r5.4xlarge (16 vCPU), might cost several dollars per hour—so a 10-hour migration could easily run into the tens of dollars.
- Log storage is often modest. For instance, 20 GB of change-data logs stored in S3 might add only a few dollars to your monthly bill.
Serverless Pricing
With AWS DMS Serverless, you’re billed on consumption:
- Data Change Units (DCUs) — 1 DCU = 2 GB of RAM.
- You pay only for the time your migration tasks are active.
- For short-lived or bursty migrations, Serverless can be more cost-effective; for sustained, heavy-throughput workloads, a provisioned instance may offer better value.
Hidden Gotchas to Watch For
- Unlimited T3 Instances
- By default, T3 instances run in “unlimited” mode. If your migration workload exceeds the CPU baseline, AWS bills extra credits at $0.075 per vCPU-hour.
- Multi-AZ Instances
- Provisioning a Multi-AZ replication instance nearly doubles the hourly rate of its single-AZ counterpart.
- Orphaned Instances
- Forgetting to stop or terminate your replication instance (especially outside the free-tier window) can lead to unexpected charges.
Keeping these factors in mind will help you optimize your AWS DMS spend and avoid surprises on your monthly bill.
Limitations & Gotchas
No tool is perfect. AWS DMS has a few limitations and tricky points to watch for:
- Engine and endpoint support: While DMS covers most popular engines, some combinations aren’t supported. For example, SQL Server Express Edition is not supported as a source. DMS also cannot migrate entirely on-premises setups (one endpoint must be in AWS). Certain AWS services have cross-region restrictions – e.g. you cannot use DMS to replicate from or to DynamoDB, OpenSearch Service, or Kinesis Streams across regions. Always check the AWS DMS “Supported Sources and Targets” documentation for any gaps.
- Schema and code migration: DMS moves data, but it does not automatically convert database schemas or code. It will create tables and primary keys on the target, but it won’t recreate secondary indexes, foreign keys, stored procedures, triggers, or views. In other words, only the essential schema is migrated by default. To handle these, you must use the AWS Schema Conversion Tool (SCT) or manual scripts. Plan to manually add indexes, constraints, or other objects after or before migration as needed. (Tip: in a full-load+CDC migration, add any non-primary indexes before the CDC phase to avoid performance problems.)
- Large Objects (LOBs): By default, DMS runs in Limited LOB mode: it migrates large object (LOB/BLOB/CLOB) columns only up to a certain size (32 KB by default). Any LOB bigger than that is skipped unless you explicitly use Full LOB mode. Full LOB mode will move all LOBs but can drastically slow performance. So, if your tables have big BLOB or JSON fields, adjust the “Max LOB Size” parameter or use full mode, and be aware of the performance impact. For example, AWS notes that PostgreSQL treats JSON data like LOBs, so you must set your LOB size threshold high enough to capture them. In summary: check your schema for LOBs and plan accordingly to avoid silent truncation.
- CDC prerequisites and quirks: For ongoing replication, the source database must be prepared. For instance, MySQL must have binary logging enabled (RDS MySQL requires backups turned on), and SQL Server needs the database set to full recovery mode. If these aren’t configured, CDC tasks will fail to start. Also watch for source-side limits: a very high transaction rate or long-running transactions can create replication lag. AWS provides specific troubleshooting for tasks (e.g. if a MySQL task repeatedly fails or stalls, you may need to tweak max_allowed_packet or timeouts).
- Data type quirks: DMS supports migrating many data types, but not every exotic type or custom format. Any data type without a clear mapping may need conversion. AWS recommends running the SCT assessment tool to find unsupported types.
In short, AWS DMS limitations boil down to: it’s data-only migration (no business logic), it has size limits on LOBs, and it requires supported source/target setups. Carefully read the AWS DMS documentation on “limitations” for your specific engine. Planning around these gotchas up front will save headaches later.
Best Practices & Pro Tips
Here are key recommendations to ensure a smooth AWS DMS migration:
- Pre-migration checklist: Before migrating, perform an assessment and inventory of your database. AWS offers tools like DMS Fleet Advisor and the Schema Conversion Tool (SCT) to analyze workloads and highlight issues. Ensure the source has CDC enabled (e.g. enable binary logs or supplemental logging). Define schemas on the target database (DMS will create tables, but you should manually create users, constraints, or indexes as needed). Test connectivity by using the DMS console’s “Test connection” for each endpoint. A dry run of a small subset can catch permission or schema problems early.
- Right-size your instance: Start with a small replication instance for tests (t3.small or t3.medium). Monitor its CPU, memory, and IOPS in CloudWatch. If it’s CPU-bound during full load, scale up or switch to a compute-optimized class (C-series). If it’s memory-bound (e.g. many cached changes), try a memory-optimized (R-series). Adjust the task’s parallelism: by default DMS loads 8 tables at once, which is usually fine on large instances. On smaller instances you can reduce the MaxFullLoadSubTasks setting to maybe 4–6 to avoid CPU or I/O contention; on beefy instances you might increase it to speed up the load.
- Schema and indexes: As noted, DMS creates only primary keys. If your workload needs secondary indexes or foreign keys, plan when to add them. A common strategy is to add indexes before the CDC phase: AWS recommends building necessary indexes before enabling ongoing replication, to avoid full-table scans when applying changes. (You can pause the task, build indexes on the target, then resume the task.) Conversely, drop or disable non-essential triggers and constraints before full load for performance, and re-enable them at cutover.
- Monitoring and troubleshooting: Use Amazon CloudWatch to watch DMS metrics (e.g. CPUUtilization, FreeableMemory, ReplicationLatency). The DMS console also shows table-level progress and any errors. If a task fails, check the task’s CloudWatch logs or console “Errors” tab for clues. Common issues like missing privileges or network timeouts will appear there. For long-running tasks, note the “FullLoadProgressPercent” metric to see how far along you are. Set up CloudWatch Alarms on high CPU or low free storage on the replication instance to catch issues early.
- Security and compliance: Follow AWS security best practices. Use IAM policies to restrict who can create or modify DMS resources. Enable SSL/TLS on your source and target connections so data in transit is encrypted. If you’re writing to Amazon S3 or Redshift, enable KMS encryption on those buckets/tables – DMS will encrypt data at rest using AWS KMS keys. Place your replication instance in a secure VPC subnet and use Security Groups to allow only the necessary ports. For example, open the source database port to the DMS instance, and the target port likewise. Always rotate or lock down credentials used by the endpoints.
By following these pre-migration checks, instance-sizing, monitoring, and security steps, you’ll reduce surprises and build confidence in your migration.
Quick-Start Tutorial (Mini Guide)
The fastest way to see AWS DMS in action is to set up a simple migration. Below is a condensed step-by-step for moving a MySQL database into AWS (for example, into Amazon RDS MySQL). Each step corresponds to actions in the AWS DMS console or CLI:
- Create a replication instance. In the AWS DMS console, choose Replication Instances and click Create replication instance. Pick an instance class (e.g. dms.t3.medium) and allocate default storage. Put it in the same VPC as your databases for connectivity.
- Create the source endpoint. Under Endpoints, choose Create endpoint. Select Source, engine MySQL, and fill in the connection details (hostname, port, username/password). You may need extra parameters (e.g. for SSL). Then Test connection to ensure DMS can reach the source.
- Create the target endpoint. Similarly, create an endpoint with type Target, engine MySQL (or RDS). Provide the endpoint settings for the destination database (e.g. an existing Amazon RDS instance). Test the connection as well.
- Configure endpoint settings. If using CDC, set any advanced settings (e.g. enable binary logging on the source). For MySQL targets, consider disabling foreign key checks (via endpoint attributes) during load for speed.
- Create a replication task. Go to Database Migration Tasks and Create task. Select your replication instance, source and target endpoints. Choose migration type “Migrate existing data and replicate ongoing changes” (full load + CDC). Specify which tables or schemas to include (you can use wildcards). Optionally, add any transformation rules to rename objects.
- Start the task. Launch the migration task. DMS will begin the full load phase – you’ll see table counts increment in the console.
- Monitor progress. Watch the task’s status. The console shows percentage progress for full load. Check CloudWatch metrics if needed. When the full load finishes, DMS will automatically transition to CDC mode and catch up on changes.
- Cut over. Once the task reports Stopped or Running (in CDC) and the migration lag is near zero, you can switch your application to the new database endpoint. DMS can continue running to sync any last transactions.
- Validation and cleanup. Verify data integrity on the target. When satisfied, stop the DMS task. If needed, you can optionally run a task assessment report before cutover. Finally, delete the DMS resources (task, endpoints, instance) if you no longer need them.
For more detailed steps and screenshots, see the AWS DMS tutorial and user guide. With these steps, you’ve migrated a MySQL DB into AWS using AWS DMS in minutes.
Conclusion
Migrating databases is complex, but AWS DMS can streamline much of the work. Key takeaways: Plan and prepare thoroughly (run premigration assessments, configure logging, and set up network/security). Use the right instance size and task settings (parallelism and indexes) for performance. Leverage CDC mode to minimize downtime. Monitor the process and consult CloudWatch logs if errors occur. Finally, be aware of AWS DMS limitations: it’s data-only (no stored procs/secondaries), has LOB size considerations, and requires at least one AWS endpoint.
Next steps: read the official AWS DMS documentation for in-depth guidance, and try a test migration using the free tier to get hands-on experience. With these tips and AWS’s tools in hand, you’ll be well-equipped to execute successful cloud database migrations with AWS DMS.
Monitor Your AWS DMS Spend with Cloudchipr
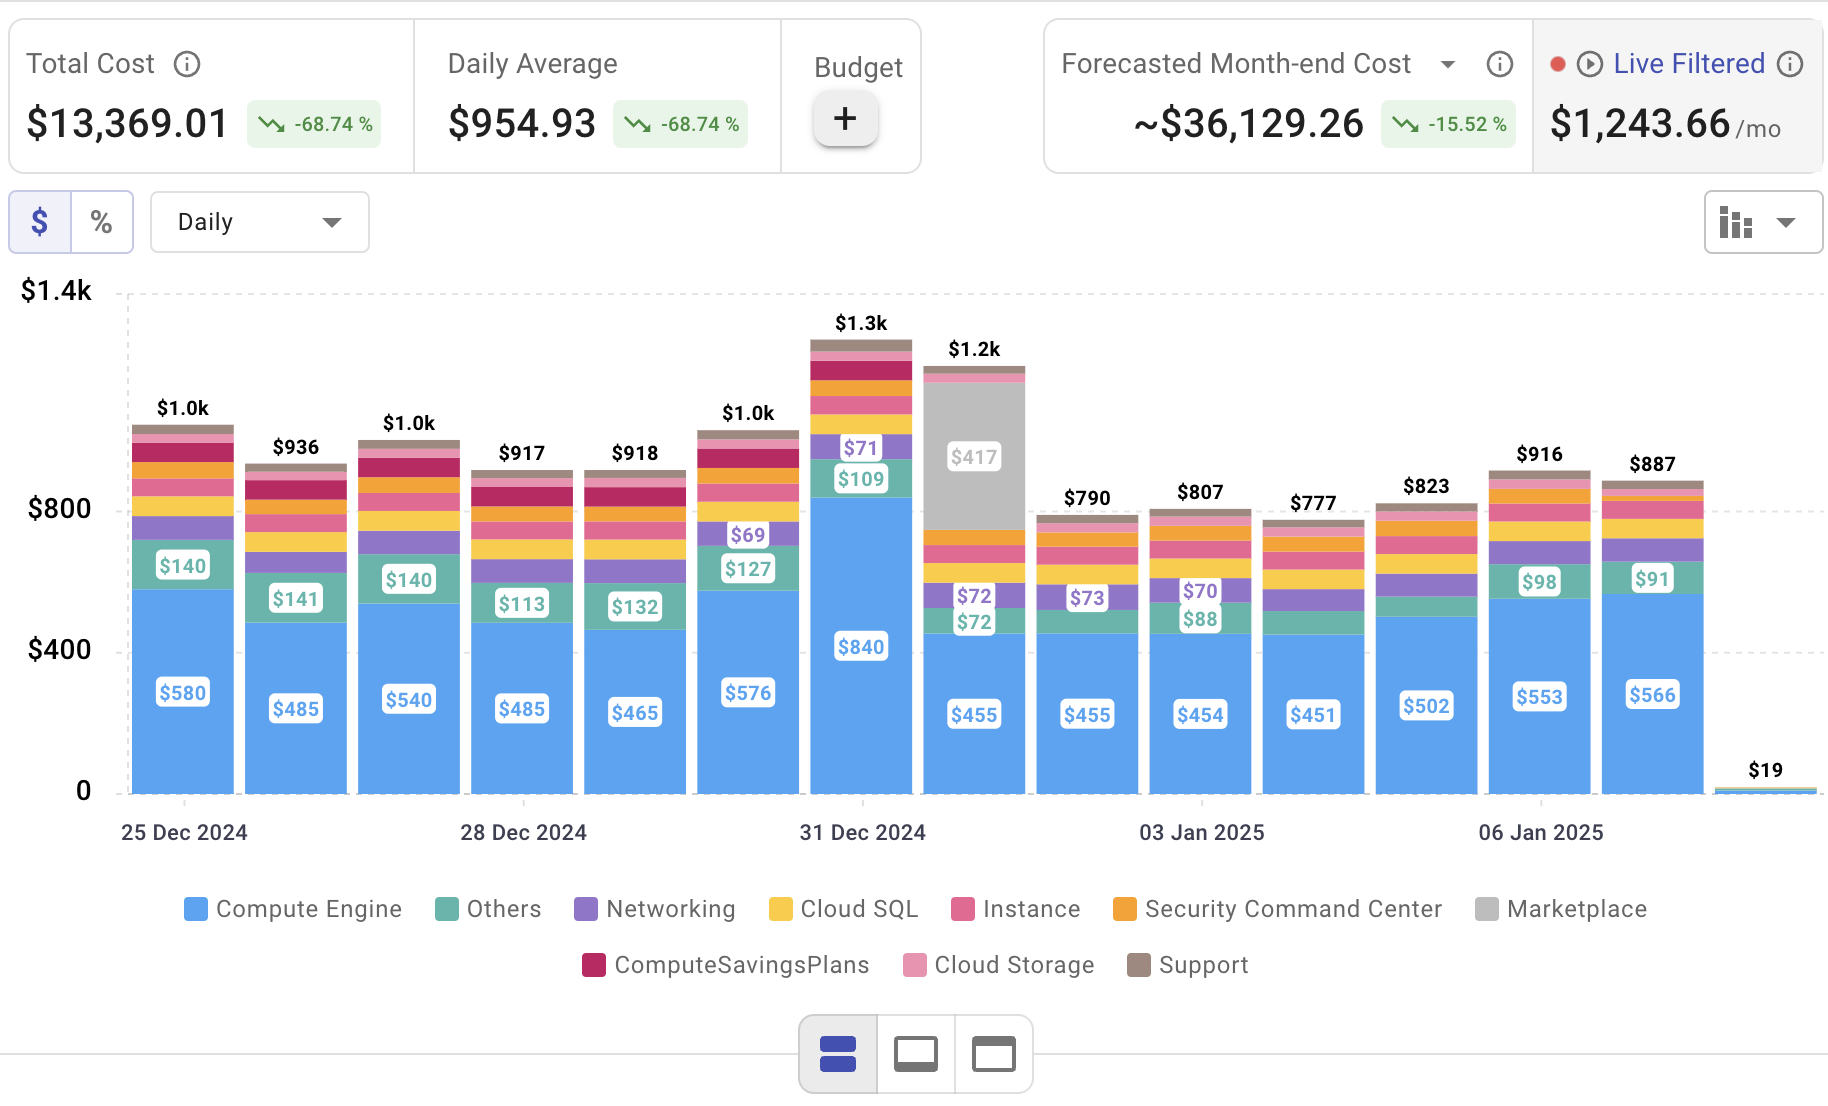
Setting up AWS DMS is only the beginning—actively managing cloud spend is vital to maintaining budget control. Cloudchipr offers an intuitive platform that delivers multi‑cloud cost visibility, helping you eliminate waste and optimize resources across AWS, Azure, and GCP.
Key Features of Cloudchipr
Automated Resource Management:
Easily identify and eliminate idle or underused resources with no-code automation workflows. This ensures you minimize unnecessary spending while keeping your cloud environment efficient.
Receive actionable, data-backed advice on the best instance sizes, storage setups, and compute resources. This enables you to achieve optimal performance without exceeding your budget.
Keep track of your Reserved Instances and Savings Plans to maximize their use.
Monitor real-time usage and performance metrics across AWS, Azure, and GCP. Quickly identify inefficiencies and make proactive adjustments, enhancing your infrastructure.
Take advantage of Cloudchipr’s on-demand, certified DevOps team that eliminates the hiring hassles and off-boarding worries. This service provides accelerated Day 1 setup through infrastructure as code, automated deployment pipelines, and robust monitoring. On Day 2, it ensures continuous operation with 24/7 support, proactive incident management, and tailored solutions to suit your organization’s unique needs. Integrating this service means you get the expertise needed to optimize not only your cloud costs but also your overall operational agility and resilience.
Experience the advantages of integrated multi-cloud management and proactive cost optimization by signing up for a 14-day free trial today, no hidden charges, no commitments.