Inside AWS IAM: A Deep Dive into Identity and Access Management
.png)
Introduction
AWS Identity and Access Management (IAM) – sometimes simply called AWS IAM or even IAM AWS – is a core AWS service that helps you securely control access to all your AWS resources. In this AWS IAM tutorial, we’ll introduce IAM’s purpose, its key concepts (like users, groups, roles, and policies), and essential tools. The goal is to keep things beginner-friendly yet detailed enough for experienced users. You’ll see how IAM manages identities and permissions, learn about features like the IAM Identity Center, Access Analyzer, Policy Simulator, and Policy Generator, and even walk through simple examples using the AWS CLI and Terraform. By the end, you should understand how IAM works and be equipped with best practices for using it effectively.
What Is AWS IAM and Why Use It?

AWS IAM is essentially the access control engine for your AWS cloud. It enables you to authenticate (identify who is signing in) and authorize (grant permissions to) users and services in your AWS account . With IAM, you can centrally manage who can log in and what they can do in your AWS environment. In other words, IAM lets you securely manage identities and access across all AWS services and resources in your account.
When you first create an AWS account, you start with a single identity: the root user (the email address used to open the account). The root user has unrestricted access to everything, but AWS strongly recommends not using the root account for everyday tasks . Instead, you should create dedicated IAM identities with only the necessary permissions. This practice protects your account by minimizing use of the all-powerful root credentials – for example, you might lock away root access and only use it for a few account management tasks that require it .
In summary, IAM’s purpose is to implement the principle of least privilege – ensuring each user or service has only the permissions required to do their job, and nothing more. It acts as a central gatekeeper where you define who (identity) can do what (action) on which resource, under what conditions. Let’s break down those building blocks and IAM’s core features.
IAM Identities: Users, Groups, and Roles

In IAM, you manage identities which represent the actors that can make requests in AWS. There are three fundamental types of IAM identities:
- IAM Users – A user is an identity for an individual person or application that needs access to AWS . Users have permanent credentials (a username/password for AWS console, and/or access keys for API/CLI access). For example, you might create an IAM user called “Alice” for a developer on your team. An IAM user can be given permissions directly or via group membership. (Note: AWS best practices now encourage using IAM roles or federated users for human access instead of long-term IAM user credentials in many cases, as discussed later.)
- IAM Groups – A group is a collection of IAM users. Groups let you assign permissions to multiple users at once, making administration easier . For instance, you might have a group “Admins” that grants admin privileges, and add appropriate users to that group. Users in a group inherit the group’s permissions. Groups are purely a convenience for managing users; they cannot be used to sign in by themselves.
- IAM Roles – A role is an identity very similar to a user, but not associated with a specific person . Instead, a role is assumable by trusted subjects. Roles have no long-term credentials of their own; instead, when someone or something assumes a role, IAM issues temporary security credentials for that session. Roles are used in scenarios like: giving AWS services (EC2, Lambda, etc.) permission to access other AWS resources on your behalf, allowing users from one AWS account to access resources in another (cross-account access), or enabling external federated identities to obtain temporary AWS access. In short, an AWS IAM role is meant to be “borrowed” dynamically by whoever needs its permissions, rather than being a named human login.

How do roles work? Each role has a trust policy that defines who (which principal) can assume the role. For example, an IAM role for an EC2 instance might trust the EC2 service, allowing EC2 instances to assume that role. When the EC2 instance launches, it gets temporary credentials via the role and can access resources (like an S3 bucket) according to the role’s permissions. Unlike a user, you cannot log in as a role directly; you always assume it through some mechanism (AWS STS, switching roles in console, etc.), gaining its privileges temporarily.
A Note on AWS IAM Identity Center (AWS Single Sign-On)

Managing a large number of IAM users across many accounts can become complex. AWS IAM Identity Center (formerly AWS Single Sign-On, AWS SSO) is a service that helps centrally manage workforce identities across multiple AWS accounts. With IAM Identity Center, you can connect an external identity source (like your company’s Active Directory or an SAML/OIDC identity provider) or create users in its own directory, and then grant those users access to AWS accounts and applications in a unified way . In essence, IAM Identity Center provides a centralized SSO portal where your team can log in once and assume roles in various AWS accounts without juggling separate IAM users in each.
For example, instead of creating an IAM user Alice in each AWS account, you can create Alice once in IAM Identity Center, assign her a federated access role (permission set) for each account (say, Administrator in Account A, ReadOnly in Account B), and she can use the single SSO login to access all her accounts. Under the hood, IAM Identity Center will automatically create the necessary IAM roles and link them to Alice’s identity . This greatly simplifies multi-account identity management. In fact, AWS Identity Center is now the recommended approach for managing workforce access to AWS. As one AWS expert noted, “AWS SSO (now IAM Identity Center) is an excellent alternative to using IAM users and groups for managing access to AWS accounts” , reducing the need to create numerous IAM users or complex cross-account role setups by hand.
To summarize identities: use IAM users (ideally with MFA) for individual long-term access only if needed, use groups to easily manage permissions for those users, use roles for applications, services, and cross-account or federated access (leveraging temporary credentials), and consider IAM Identity Center for scalable user management across accounts. Next, we’ll look at how to define what each identity can do using IAM policies.
IAM Policies and Permission Management

Defining permissions in IAM is done through policies. An IAM policy is basically a JSON document that explicitly lists what actions are allowed or denied for a particular identity or resource. Policies enable the fine-grained control that makes AWS IAM so powerful. Let’s unpack how they work.
Policy Basics: Who can do what on which resources
A policy typically has a structure that includes: an Effect (Allow or Deny), an Action (the specific AWS operation), a Resource (the AWS resource the action applies to), and optional Condition keys (to impose extra conditions like time of day, source IP, etc.). For example, you might have a policy statement that Allows the Action s3:PutObject on the Resource arn:aws:s3:::my-bucket/* (all objects in “my-bucket”), with a condition that it must be from a certain IP range. Policies let you mix multiple statements to cover different permissions needs in one document.
In IAM’s JSON policy language, the Action element specifically describes the AWS operations that will be allowed or denied . Every AWS service defines its own set of actions. For instance, Amazon S3 has actions like ListBucket or GetObject, EC2 has StartInstances, IAM itself has actions like ChangePassword, and so on . In a policy, actions are prefixed by the service (e.g., s3:ListBucket, ec2:StartInstances). You can even use wildcards like "s3:*" to represent “all S3 actions” (though granting * is usually too permissive except in specific cases). By listing specific AWS IAM actions in the policy, you precisely control which operations an identity can perform on which resources.
Identity-based vs Resource-based policies: There are different types of IAM policies. The most common are identity-based policies – these are policies that you attach to an IAM identity (user, group, or role) to grant them permissions. For example, you might attach a policy to the Alice user allowing her to start EC2 instances. These policies answer the question “What can this identity do?” On the other hand, resource-based policies are attached to AWS resources to specify who (which principals) can access that resource and what they can do. A classic example is an S3 bucket policy, which you attach to a bucket to grant (or deny) access to certain AWS principals (identities), possibly including identities from other AWS accounts. Resource-based policies are supported by a subset of services (S3, SQS, SNS, KMS, etc.), and they include a Principal element to define who is allowed . In effect, identity-based and resource-based policies work together: an operation is allowed only if no policy explicitly denies it and at least one relevant policy allows it . For most day-to-day IAM work, you will create identity-based policies (often as managed policies, explained below), but it’s good to know resource policies exist, especially for cross-account access scenarios.
AWS IAM also encompasses some special policy types for advanced use cases, such as permissions boundaries (which limit the maximum permissions an identity can have), Service Control Policies (SCPs) in AWS Organizations (to set org-wide restrictions), and session policies (passed in as part of assuming a role). However, for an introduction, the main focus is on identity-based policies that grant permissions.
Managed Policies vs Inline Policies
When attaching policies to identities, you have two ways to store them:
- Managed Policies: These are standalone policy documents that exist as separate IAM resources. AWS managed policies are provided by AWS (pre-built common permissions like “AdministratorAccess” or “AmazonS3ReadOnlyAccess”), which can be a good starting point . You can also create your own customer managed policies – reusable policies you write and maintain. Managed policies can be attached to multiple identities, making it easy to apply a standard set of permissions to many users or roles. AWS managed policies follow best-practice updates over time, but it’s recommended to eventually tailor your own least-privilege policies for critical use cases .
- Inline Policies: These are policy documents embedded directly in a user, group, or role. Inline policies are used for one-off or tightly coupled permissions that you don’t intend to reuse. Generally, AWS recommends managed policies for reusability and clarity, resorting to inline policies only when necessary (since inline policies are directly tied to a single identity).
Whether managed or inline, policies have the same JSON structure. IAM evaluates all applicable policies (identity policies on the caller, resource policy on the target, etc.) when deciding to allow or deny a request. By default, everything is denied, and an explicit allow in a policy is needed to grant access (unless an explicit deny is present somewhere, which always wins over allows).
Tip: Start with AWS managed policies for convenience (they cover many common job functions), but review and refine permissions to be minimal. Over time, consider crafting custom policies that grant only the specific actions your users need . The IAM Access Analyzer tool (coming next) can even help generate fine-tuned policies based on actual usage.
AWS IAM Policy Generator

Authoring JSON policies by hand can be tricky for newcomers. The AWS IAM Policy Generator is a handy web-based tool that helps you build policies without writing JSON from scratch. It provides a step-by-step interface to select a policy type, choose a service, pick actions and resources, and add conditions, then it generates the JSON policy document for you . For example, you could use the Policy Generator to easily create an S3 policy by selecting “Amazon S3” as the service, picking actions like ListBucket or GetObject, specifying the bucket ARN as the resource, and letting it output the JSON. This tool “simplifies the process of creating policy documents” for various services including SQS, S3, SNS, and IAM itself . It’s great for learning and getting the structure right. (You can find the policy generator on the AWS site – it’s often used in AWS IAM tutorials and labs when teaching IAM.)
Testing Permissions with the IAM Policy Simulator

How do you know if a policy you wrote will actually allow or deny the actions you expect? That’s where the IAM Policy Simulator comes in. AWS provides a console tool called Policy Simulator (and an API/CLI for it) that lets you test IAM policies in isolation to see their effects. With the IAM policy simulator, you can input one or more policies (from users, groups, roles, or new custom policies) and simulate API calls to check whether they’d be allowed or denied . For example, you could simulate the action “s3:PutObject” on a specific bucket using a selected user’s policies to verify if that user currently has upload access or not. This is extremely useful for troubleshooting permission issues or validating new policies before deploying them.
Common uses of the simulator include: testing identity policies attached to a user or role (even multiple policies at once), testing the impact of a proposed policy change, checking permissions boundaries or resource-based policy interactions, and determining which specific policy statement is affecting the decision . It’s important to note the simulator works with the information you provide – it doesn’t actually make real AWS calls, so it might not account for certain runtime factors, but it’s accurate in evaluating IAM logic. AWS cautions that after using the simulator, you should still test in your live environment to confirm everything works as intended . Nonetheless, the policy simulator is an indispensable tool to troubleshoot and refine IAM policies without trial-and-error directly on resources.
By writing clear policies and testing them with the simulator, you can achieve precise control over access in your AWS environment. Next, we’ll discuss another helpful feature for monitoring and improving your IAM setup: Access Analyzer.
IAM Access Analyzer: Keeping an Eye on Access

IAM Access Analyzer is a newer IAM feature that helps you analyze and monitor access in your AWS environment. Think of it as a smart assistant that can review your policies and environment to highlight potential security risks or help you optimize permissions. Access Analyzer provides multiple capabilities:
- External Access Analysis: Access Analyzer can scan your account (or your whole AWS Organization) to identify resources that are shared with an external entity (like resources that some outside principal can access) . For example, if an S3 bucket’s policy allows access to a different AWS account or to the public, Access Analyzer will flag that. This helps you catch unintended public or cross-account access. It uses logic-based reasoning to analyze resource-based policies on supported resources and generates findings for any that grant access outside your designated zone of trust . You can then review each finding to see if that access is intended or if you need to lock it down.
- Unused Permissions Analysis: Access Analyzer can also detect unused access – essentially, it looks at IAM principals (users/roles) and finds if they have permissions granted that they haven’t actually used. For instance, you might have a role that has S3 full access, but in practice it never called any S3 operations. Access Analyzer can highlight such cases so you can consider tightening the role’s policy . This is great for implementing least privilege over time: you grant what you think is needed, then later remove what was never used.
- Policy Validation and Suggestions: When you write or edit policies in the IAM console, Access Analyzer now provides policy validation checks. It will warn you of any issues like invalid syntax, and even flag overly broad permissions or other best-practice violations. It essentially validates your IAM policies against policy grammar and AWS best practices . For example, if you accidentally include a wildcard that grants more access than intended, it might suggest tightening it. These validations help you “refine permissions” to be more secure.
- Policy Generation (Least Privilege Policies): One of the most powerful features is using Access Analyzer to generate IAM policies based on CloudTrail logs . You can point Access Analyzer at a set of CloudTrail events (like those produced by a role over time) and it will propose a policy that grants just the actions that were actually used. This addresses a common challenge: figuring out the minimal set of permissions required for a workload. By analyzing access activity, IAM Access Analyzer can suggest a policy that implements least privilege, which you can then fine-tune. AWS’s documentation notes that Access Analyzer “generates IAM policies based on access activity” to help you converge on least privilege .
In short, IAM Access Analyzer is all about visibility and verification for IAM. It continuously monitors and helps you prove that your policies are granting only the intended access . Enabling Access Analyzer (which involves creating an analyzer either at account level or organization level) is a best practice for governance. It provides a dashboard of findings – for example, you might see a summary that X number of S3 buckets are publicly accessible, or that certain IAM roles have not been used in 90 days. You can drill in, see the details of each finding, and then take action (modify a policy, remove unused permissions, etc.) accordingly .
Real-World Tip: After setting up IAM Access Analyzer, make it part of your routine to check its findings. It can serve as an automated audit of your IAM posture. For example, if Access Analyzer reports an S3 bucket policy is allowing access to an unknown external account, you might catch a misconfiguration before it becomes an incident. Or if it shows a role hasn’t used certain permissions in months, you can confidently tighten that role’s policy knowing it won’t break anything. This kind of proactive analysis is invaluable as your AWS environment grows.
With IAM identities, policies, and analysis tools covered, let’s look at how you can interact with IAM through automation and infrastructure-as-code, which is crucial for efficient cloud operations.
Managing IAM Programmatically: AWS CLI and Terraform
While the AWS web console is useful for interactive setup and learning, many teams prefer to manage IAM through code and scripts for consistency and automation. Here we’ll see two approaches: using the AWS Command Line Interface (CLI) and using Terraform (Infrastructure as Code) to create and manage IAM resources. Both methods allow you to treat IAM configurations as code that can be version-controlled and reused.
Using the AWS CLI for IAM Tasks
AWS offers a unified CLI tool (the aws command) which includes a dedicated iam subcommand for Identity and Access Management. This means anything you can do in the IAM console – creating users, updating policies, etc. – can also be done with CLI commands. In fact, “you can access the features of IAM using the AWS CLI” easily . This is especially handy for scripting user onboarding, rotating keys, or setting up baseline roles in new accounts.
Let’s walk through a simple example using the AWS CLI to manage IAM. Suppose we want to create a new IAM user and grant them read-only access to S3. We can do this step-by-step with CLI commands:

In the code above, we first create a user Bob. Then we attach an existing AWS managed policy called AmazonS3ReadOnlyAccess to that user. This managed policy (provided by AWS) contains all the necessary IAM actions for read-only permissions on S3. After running these commands, Bob now has the ability to log in (you’d also create login credentials or access keys as needed) and list or get objects from any S3 bucket, but not modify or delete them – exactly what we wanted.
We could extend this example: for instance, we could create an IAM group for read-only users, attach the S3 read-only policy to the group, and then add Bob to that group. The AWS CLI supports all of these operations (with commands like create-group, add-user-to-group, etc.) . Managing via CLI not only saves time but ensures repeatability (you can rerun a script to set up the same policies in another account, for example).
One important note: If you use the CLI or API to script IAM changes, remember that IAM is a global service per account (no region specific), and changes are eventually consistent (it may take a short time to propagate changes worldwide) . Usually this isn’t noticeable for small scale operations, but for automation it’s wise to insert a short pause or retry logic after creating a new user or policy before using it immediately.
Using Terraform to Define IAM (Infrastructure as Code)
Terraform is a popular Infrastructure-as-Code (IaC) tool that lets you describe your cloud resources in configuration files. Terraform has an AWS provider that includes support for IAM resources, allowing you to codify users, roles, policies, and more. This approach is powerful for deploying consistent IAM setups across multiple environments or accounts, and for integrating IAM changes into a version-controlled IaC pipeline.
Let’s look at an example Terraform configuration for an IAM role. We will create a role that an EC2 instance can assume, and give that role permission to read from S3. This would be similar in effect to the CLI example above (granting S3 read-only access), but via a role for EC2 rather than a user.
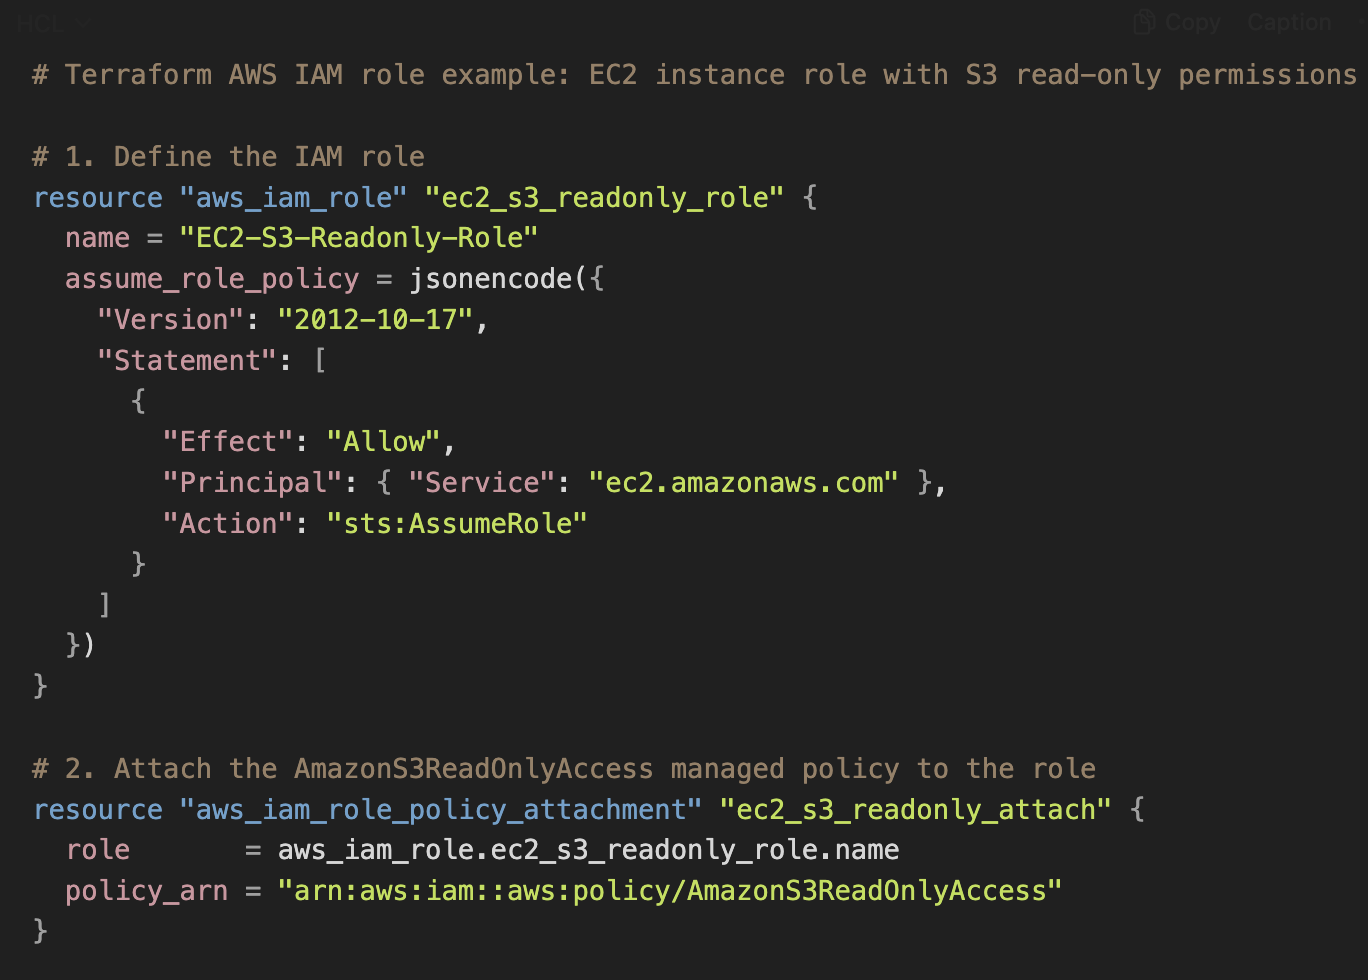
Let’s break down what this Terraform code does:
- We define an aws_iam_role resource named ec2_s3_readonly_role. We give it a name, and crucially we specify an assume_role_policy. This is the trust policy that grants permission to EC2 service to assume the role. We use jsonencode in Terraform to embed a JSON object (for clarity) that allows the principal "Service": "ec2.amazonaws.com" to assume the role via the action sts:AssumeRole. In effect, this means “EC2 instances are allowed to take on this role.”
- Next, we use aws_iam_role_policy_attachment to attach the AWS-managed policy AmazonS3ReadOnlyAccess to our role. This gives the role the actual S3 read permissions.
After applying this Terraform configuration, any EC2 instance that you launch with the instance profile of EC2-S3-Readonly-Role will automatically get credentials and be able to list/get objects from S3 (but not write/delete). You achieved this without ever clicking in the console – simply by writing and applying code. Terraform will handle creating the role and setting the trust policy and attachments via AWS APIs.
One benefit of using Terraform for IAM is that you can manage changes through code reviews and track them. For example, if you need to grant an additional permission, you’d modify the Terraform config (perhaps attach another policy or define a custom aws_iam_policy), and the change can be reviewed in version control and then applied. Terraform will also detect drift or out-of-band changes to the IAM resources if someone altered them in the console, helping maintain the state defined in code.
A note of caution: Because IAM is critical to security, be careful with your IaC workflows – ensure that changes to IAM configurations are reviewed and Terraform state is protected. Also, certain IAM resources (like access keys) might be better handled with specialized processes (Terraform can create keys, but you wouldn’t want them stored in state in plaintext). For most identity and policy definitions, however, Terraform is a great solution.
By using tools like the AWS CLI and Terraform, you gain automation, consistency, and repeatability in managing IAM. This is especially useful in environments where many IAM changes need to be applied or mirrored across accounts.
IAM Best Practices and Tips
To wrap up, here are some essential IAM best practices and tips, distilled from official AWS guidance and real-world experience, to help you use IAM securely and effectively:
- Enable MFA and Protect Credentials: Always enable multi-factor authentication for the root user and any IAM users with console access (especially admins) . MFA adds an extra layer of security on top of passwords. Also, regularly rotate any long-term credentials (passwords, access keys) for IAM users, and remove unused credentials . If an IAM user or access key hasn’t been used in a while, consider disabling or deleting it .
- Use Roles for AWS Services and Applications: Don’t hard-code AWS credentials in your applications. Instead, use IAM roles for EC2 instances, Lambda functions, ECS tasks, etc., to provide temporary credentials. This eliminates the need to manage keys and is far safer. AWS recommends using IAM roles for workloads so that they get automatic, rotating temporary credentials . Likewise, for human users, prefer having them assume roles (perhaps via IAM Identity Center or federation) rather than using IAM user access keys in day-to-day work.
- Principle of Least Privilege: Aim to give each IAM principal (user or role) the minimum set of permissions it needs, and no more. Start with restrictive policies and only open up what’s required for functionality. AWS’s official advice: “When you set permissions with IAM policies, grant only the permissions required to perform a task.” . Auditing tools like IAM Access Analyzer can help by identifying permissions that have never been used, so you can remove them . Over time, refine policies to tighten access as much as possible while still allowing your applications to function.
- Use Groups and Managed Policies: Instead of assigning the same policy to many users individually, put those users in an IAM group and attach the policy to the group. This not only saves time but reduces the chance of error. Similarly, favor managed policies (especially customer-managed) for common permission sets – this way you have fewer policy documents to maintain, and any update to a managed policy propagates to all identities that use it. AWS managed policies can be a good starting point , but be aware they might be broader than necessary; use them to get started, then migrate to custom least-privilege policies for critical accounts or roles .
- Organize with Paths or Naming Conventions: IAM resources can be given a “path” (like a folder structure) or at least consistent naming. This can help you manage large numbers of users/roles. For example, you might prefix role names with the team or project (e.g., RetailApp-EC2-Role), or use paths like /application/retail/ for all roles related to a particular app. While not affecting permissions, good organization makes it easier to locate and audit IAM entities.
- Monitor and Audit IAM Activity: AWS CloudTrail logs all IAM API calls. Use CloudTrail to monitor changes to IAM (like who created a user or changed a policy). Consider setting up AWS Config rules or CloudWatch alarms for sensitive changes (e.g., root login attempts, policy changes, etc.). Additionally, regularly review IAM Access Analyzer findings for any unexpected resource access , and make use of the IAM Access Advisor (in the console on each user/role’s page) which shows the last accessed time for services by that principal – this is useful to spot if a user hasn’t used certain permissions in a long time.
- Avoid Using Root Account Except for Necessary Tasks: The root user has unlimited power in your AWS account and cannot be restricted by IAM policies . Secure the root credentials (enable MFA on root, maybe even lock them in a safe) and use role-based access for daily administration. AWS provides a list of [tasks that require root user] – for everything else, use an IAM admin role.
- Leverage IAM Identity Center for Workforce Access: If you have a large team or multiple AWS accounts, invest time in setting up AWS IAM Identity Center (SSO). This aligns with the best practice of centralized identity management. It can simplify user access management at scale and improves security by integrating with your existing identity provider and by reducing the sprawl of IAM users and long-term credentials.
- Use Policy Conditions for Extra Security: Whenever possible, add Conditions to your policies to make permissions context-aware. For instance, require that certain API calls come from your corporate IP range, or limit access to S3 buckets to requests with encryption. IAM condition keys (like ${aws:MultiFactorAuthPresent} or service-specific keys) allow you to put safety belts on broad actions. For example, you could allow an EC2 instance to assume a role only if it has a certain tag, or allow a user to call an API only if they are using MFA. These conditions help enforce security invariants beyond just “User A can do Action B.”
Following these best practices will significantly strengthen your AWS security posture. IAM is a powerful tool – it can enforce strict security, but misconfigurations can lead to overly permissive access. Treat IAM changes with the same care as application code changes. When in doubt, start with less access and incrementally open up as needed, rather than the reverse.
Conclusion
AWS IAM is a foundational service that every AWS user should get comfortable with. It may seem daunting at first, but its core concepts – identities (users, groups, roles) and policies (permissions) – are quite logical. In this introduction, we covered how IAM helps control access to AWS resources by authenticating principals and authorizing their actions . We discussed IAM users, groups, and roles as ways to represent human and machine identities , and saw how IAM Identity Center can simplify managing many users across accounts. We delved into policies, learning how to allow or deny specific AWS actions through JSON policy documents, and highlighted tools like the Policy Generator to create policies and the Policy Simulator to test them. We also explored IAM Access Analyzer, which provides valuable insight by checking for external access and helping right-size permissions .
Through a couple of examples, we saw IAM in action via the AWS CLI and Terraform – demonstrating that IAM management can be automated and treated as code for better scalability and control. Ultimately, IAM is all about the principle of least privilege and secure management of who can do what in your cloud. By applying best practices such as avoiding root use, using roles and temporary credentials, enabling MFA, and continuously auditing permissions, you can harness AWS IAM to build a secure foundation for all your AWS workloads.
Optimize Your Cloud Expenses with Cloudchipr
Implementing robust AWS IAM practices is just the first step—effectively managing ongoing cloud costs is crucial to staying within your budget. Cloudchipr offers a simple, intuitive platform that provides comprehensive multi-cloud cost visibility, helping you reduce waste and optimize resources across AWS, Azure, and GCP.
Key Features of Cloudchipr
Automated Resource Management:
Easily identify and eliminate idle or underused resources with no-code automation workflows. This ensures you minimize unnecessary spending while keeping your cloud environment efficient.
Receive actionable, data-backed advice on the best instance sizes, storage setups, and compute resources. This enables you to achieve optimal performance without exceeding your budget.
Keep track of your Reserved Instances and Savings Plans to maximize their use.
Monitor real-time usage and performance metrics across AWS, Azure, and GCP. Quickly identify inefficiencies and make proactive adjustments, enhancing your infrastructure.
Take advantage of Cloudchipr’s on-demand, certified DevOps team that eliminates the hiring hassles and off-boarding worries. This service provides accelerated Day 1 setup through infrastructure as code, automated deployment pipelines, and robust monitoring. On Day 2, it ensures continuous operation with 24/7 support, proactive incident management, and tailored solutions to suit your organization’s unique needs. Integrating this service means you get the expertise needed to optimize not only your cloud costs but also your overall operational agility and resilience.
Experience the advantages of integrated multi-cloud management and proactive cost optimization by signing up for a 14-day free trial today, no hidden charges, no commitments.