Understanding AKS Pricing: Key Cost Drivers Explained
.png)
Introduction
Azure Kubernetes Service (AKS) pricing can seem complex at first, but it boils down to two main parts: the managed control plane (the “brains” of the cluster) and the worker nodes (the VMs that run your containers). In this blog post, we’ll break down AKS pricing– from the new AKS pricing tiers (Free, Standard, Premium) to what you get at no cost versus what Azure charges for. We’ll also walk through examples with the AKS pricing calculator to help you estimate costs confidently. Whether you’re experimenting with a small cluster or running production workloads at scale, this guide will clarify how AKS pricing works so you can make informed decisions without any surprises on your bill.
AKS Pricing Model Overview
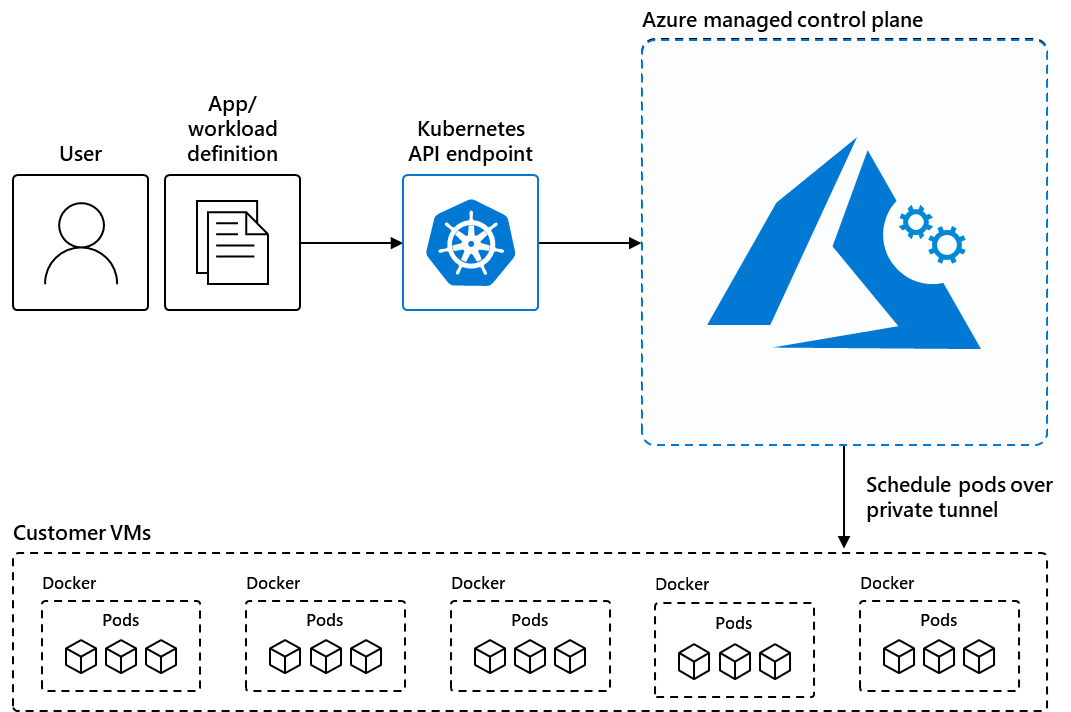
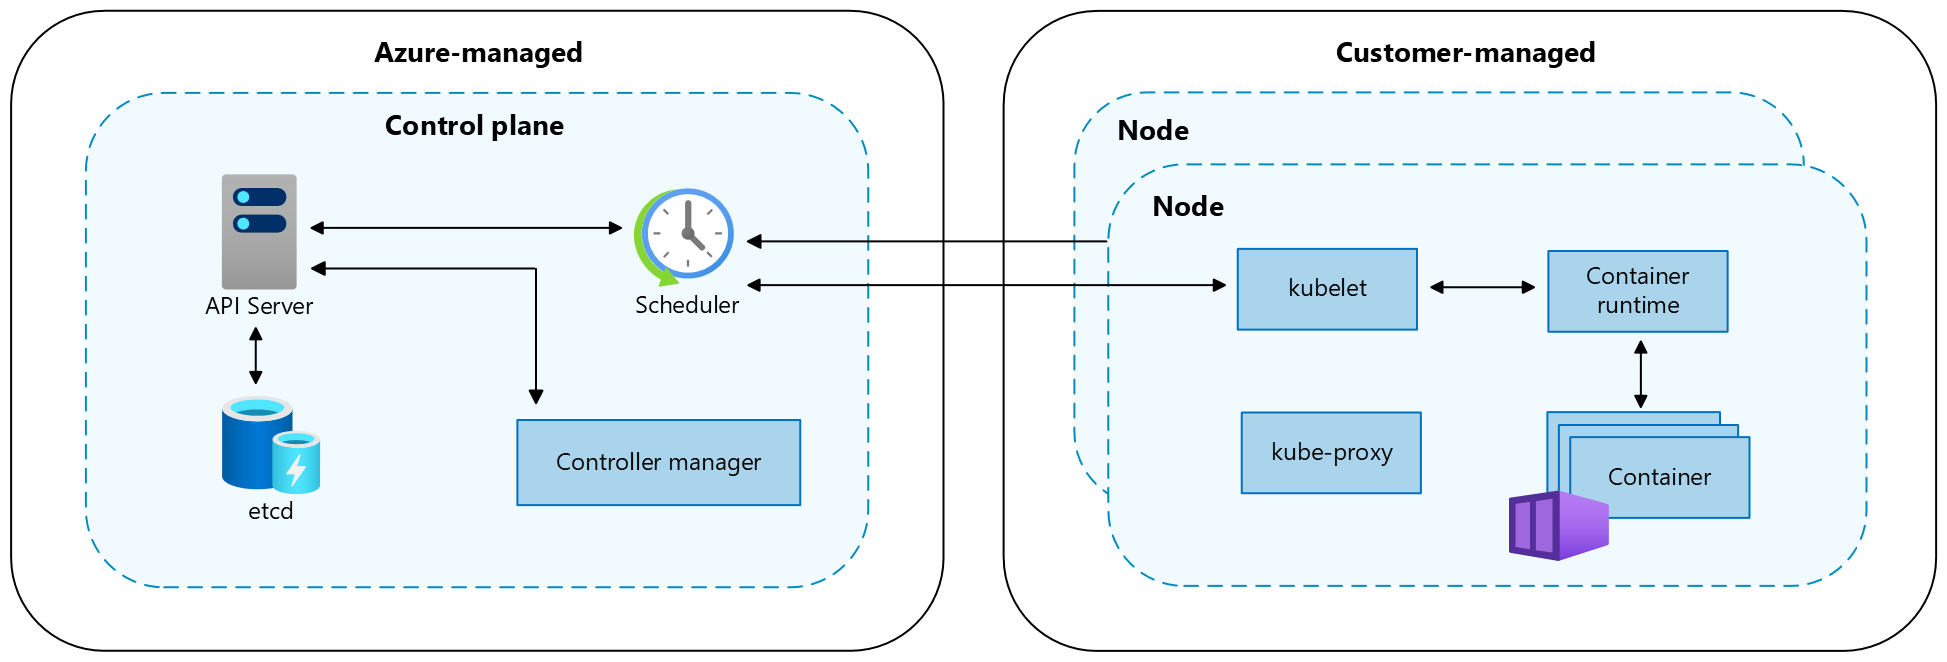
AKS is a managed Kubernetes service, which means Azure handles a lot of the heavy lifting for you – especially in the control plane. The control plane includes critical components like the Kubernetes API server and etcd database (which orchestrate and track the cluster state). Azure hosts and manages these for you. By default (in the Free tier), Azure does not charge for the control plane at all. You only pay for the resources you deploy, mainly the node VMs and any extra services your cluster uses.
Think of it like Azure providing a free chauffeur (the control plane) to drive your Kubernetes “car” – you just pay for the fuel and maintenance (the nodes, storage, etc.). However, if you want a guaranteed level of service for that chauffeur (higher uptime guarantees or long-term support), you can opt to pay a small fee – which brings us to the AKS pricing tiers.
AKS Pricing Tiers: Free, Standard, and Premium
Azure introduced three pricing tiers for AKS cluster management: Free, Standard, and Premium . These tiers affect how the control plane is managed and whether there’s an extra charge for it. Let’s break down each tier:
- Free Tier – “Always free” control plane: This is the default for AKS. Azure’s management of the Kubernetes control plane is provided at no cost in this tier. You only pay for the underlying resources (the worker nodes, load balancer, storage, etc.). There is no uptime SLA financially backed by Microsoft on the free tier control plane. In practical terms, Azure still aims for high availability (internally targeting >99.5% uptime) even on free clusters, but there’s no guaranteed SLA if things go wrong. The Free tier is great for experimenting, development, or small workloads. Microsoft recommends it for clusters under about 10 nodes (though it can technically support up to 1,000 nodes) – beyond that, you should consider the next tier for reliability.
- Standard Tier – SLA-backed control plane: The Standard tier is designed for production and mission-critical workloads that need a financially backed uptime guarantee. In this tier, Azure enables an Uptime SLA for the Kubernetes API server (guaranteeing 99.95% availability for clusters using Availability Zones, or 99.9% otherwise). There is a fixed charge for this enhanced reliability: about $0.10 per cluster per hour for the control plane in Standard tier. That comes out to roughly $72 per month for each AKS cluster you run in Standard tier (regardless of its size). You still pay for your nodes and other resources as usual – the $0.10/hr is essentially a management fee for the SLA and the extra redundancy Azure provides. In return, Standard tier clusters get more robust control plane infrastructure (more replicas of the API servers, higher etcd throughput limits, and support for up to 5,000 nodes in a cluster). This tier is a good default for any production environment where uptime is important.
- Premium Tier – SLA and long-term support: Premium tier is meant for enterprises with mission-critical, at-scale workloads that require not just an SLA but also extended support for older Kubernetes versions. Premium includes everything in Standard (the high-availability control plane with SLA) and adds AKS Long-Term Support (LTS) for Kubernetes. LTS allows you to stay on a supported Kubernetes version for up to 2 years, even after the community support would normally end. This is useful if your organization needs more time to upgrade Kubernetes versions for compliance or stability. The Premium tier carries a higher fixed cost – about $0.60 per cluster per hour for the control plane (roughly $432 per month). It’s about 6× the cost of Standard, reflecting the value of extended support and any additional engineering backing from Microsoft. Premium tier is recommended only if you truly need that two-year support window or other premium benefits for your AKS clusters running critical workloads. For most production needs, Standard will suffice, but Premium is there for the “extended warranty” peace of mind.
What’s common across all tiers? In all three tiers, you “pay-as-you-go” for the resources you consume in your cluster. The difference lies only in whether you pay an extra fee for the control plane management. Free = no fee (no SLA), Standard = $0.10/hr for SLA, Premium = $0.60/hr for SLA+LTS. No matter the tier, the worker nodes and other infrastructure are billed the same way.
Breaking Down AKS Costs: What’s Free vs. What You Pay For
It’s critical to understand which parts of AKS are included at no additional cost and which parts will appear on your Azure bill. Here’s a breakdown:
- AKS Control Plane – As discussed, the managed Kubernetes control plane (API server, etcd, scheduler, etc.) is free of charge on the Free tier. If you opt for Standard or Premium tier, you pay the fixed hourly cluster management fee for the SLA/LTS. Other than that fee, there are no direct usage-based charges for the control plane – you don’t pay for CPU or memory of the masters; Azure covers that. It’s either free or a flat rate depending on tier.
- Worker Nodes (VMs) – These are the VMs in your node pools that actually run your containers. You always pay for node VMs on AKS, since they are part of your Azure account’s resources. Each node is an Azure Virtual Machine, so its cost depends on the instance size, region, and runtime. For example, a Standard_D2s_v3 (2 vCPU, 8 GB RAM) Linux VM in East US is roughly on the order of $0.096 per hour (~$70 per month) on pay-as-you-go. If you have a cluster with 3 such nodes, that’s about $210/month just for the VM compute. The key point: node count and VM size directly drive your AKS costs. If you scale out with more nodes or use larger VM types, your costs increase linearly. Conversely, scaling down or shutting down nodes will save you money. (Tip: You can use features like cluster autoscaler to dynamically adjust node count based on load, ensuring you only pay for what you need at any time.) Keep in mind Azure offers discounts for one- or three-year reserved instances and savings plans on VMs, which can significantly reduce node costs if you have steady workloads.
- Storage (Persistent Volumes) – Any storage your workloads use will be billed. In AKS, if you use Kubernetes Persistent Volume Claims backed by Azure Managed Disks or Azure Files, you pay for those storage resources. For example, a 100 GB Standard SSD managed disk attached for a volume might cost on the order of a few dollars per month. Azure charges storage mostly per GB allocated (and possibly per transaction for certain disk types). If your cluster has stateful applications (databases, etc.), remember to include disk costs in your estimates. Deleting a PVC may delete the disk (depending on your settings), which would stop further charges for that volume. Ephemeral storage (container scratch space or emptyDir volumes) on the node’s disk doesn’t incur separate cost beyond the VM itself. But any persistent storage (managed disks or file shares) allocated for AKS is a billed resource.

- Networking (Load Balancers & IPs) – Exposing services from your cluster can incur networking charges:
- Load Balancers: By default, if you create a Kubernetes Service of type LoadBalancer, Azure will provision an Azure Load Balancer (Standard SKU) to route traffic to your pods. The Standard Load Balancer has a nominal cost – roughly on the order of $0.025 per hour (about $18 per month) for up to 5 load-balancing rules, plus a small fee per GB of data processed. So if your AKS cluster uses a couple of LoadBalancer services, you might see ~$20-$30/month in LB charges. (The older Basic Load Balancer was free but had limited capabilities; AKS now uses Standard LB in most cases for production clusters.)
- Public IP Addresses: When using a Standard Load Balancer or creating any public ingress, you typically allocate a Public IP. Standard Public IPs have a small hourly cost (for example, on the order of $0.0036–$0.005 per hour, ~$2–$4 per month). Each additional public IP (for instance, if you have multiple services or an ingress controller with a public IP) will add a bit to your bill.
- Data Egress: While inbound data to Azure is free, outbound data (egress) from your cluster (e.g., users downloading content from a service) is charged per GB. This isn’t an AKS-specific charge – it’s part of Azure bandwidth pricing. But if your AKS services serve a lot of external traffic, consider data transfer costs in your estimate.
- Other Azure Services Integrated with AKS: AKS can hook into various Azure services, and those have their own pricing. Some common ones to watch:
- Azure Monitor for Containers (Container Insights): If you enable monitoring on your AKS cluster, it will send logs and metrics to Azure Monitor. Azure Monitor and Log Analytics workspaces incur costs based on data ingested and stored. This means the more telemetry your cluster sends (pod logs, metrics, etc.), the more you pay for monitoring. The AKS service itself doesn’t charge for this – but you’ll see charges on Azure Monitor and storage for logs.
- Microsoft Defender for Containers: This is an optional security add-on that can scan images and provide threat detection for AKS. It is charged per vCore of nodes per hour (for example, a few cents per vCPU/hour). If you enable it, it will appear as a separate line item (Defender for Cloud) on your bill.
- Azure Container Registry (ACR): Often you’ll use ACR to store container images for AKS. ACR has its own storage costs (based on the tier and GBs of storage). While not part of AKS billing, it’s related to running AKS if you use it.
In summary, Azure AKS pricing follows a simple rule: you only pay for the infrastructure you use. The managed Kubernetes services (scheduling, master nodes management) are free unless you opt into paid guarantees (SLA/LTS). Everything else – VM compute, storage, networking – is billed per Azure’s standard rates. There are no surprise fees for “using Kubernetes” itself on AKS beyond what’s listed above. This pay-as-you-go model lets you start small and scale up, paying incrementally for additional resources as your needs grow.
Key Factors That Influence Your AKS Cost
When planning your AKS deployment, keep in mind a few key factors that can swing the cost up or down:
- Cluster Size (Number of Nodes): More nodes = more VMs = higher cost. This is the most direct factor. Rightsizing your cluster and using autoscaling to remove idle nodes can save a lot. For instance, running 10 nodes will roughly cost five times more than running 2 nodes of the same type (minus the slight fixed cost if using Standard/Premium tier). If you only need extra capacity at peak times, consider the cluster autoscaler to scale down when idle.
- VM Size and Type: Azure has a wide range of VM sizes (from small B-series burstable VMs to large memory-optimized or GPU VMs). Larger or specialized VMs cost more per hour. For example, a node with 4 vCPUs will cost roughly double that of a node with 2 vCPUs (in the same family). GPU-enabled nodes (like NC or ND series for machine learning) can be very expensive – often dollars per hour – so only use those if needed. Also note, Windows nodes typically cost more than Linux nodes of the same size because Windows licensing is included in the VM price. If your AKS cluster runs Windows container workloads, factor in that premium (e.g., a Windows VM might be ~1.5× the cost of the Linux equivalent).
- Region: Azure service prices vary by region. Choosing a different region can affect cost due to local pricing and demand. For example, running a certain VM type in US East might be a bit cheaper than in Japan East or Australia. The difference isn’t usually huge (maybe 5-20%), but it can add up for large deployments. However, you should weigh this against performance (latency to users) and data residency requirements – don’t pick a region solely to save a few dollars if it impacts your app’s users or compliance. Generally, regions in the US tend to have the lowest prices, while some smaller or newer regions can be pricier.
- Scaling Strategy (Static vs. Dynamic): If you run a fixed number of nodes 24/7, you’ll pay for all those hours. If your workload is periodic or spiky, leverage scaling. For example, a dev/test cluster could be scaled down or even scaled to zero nodes during off-hours to save money. AKS supports cluster autoscaling and even scheduled scaling via scripts or Azure Automation. Using this strategically can reduce the monthly bill. Also consider Kubernetes pod autoscaling (HPA) in combination with cluster autoscaler, so the cluster adds nodes only when application demand truly requires it.
- Reservations and Discounts: If you know you’ll run certain VMs for a long time, Azure Reservations can save you up to ~30-60% compared to pay-as-you-go. You can reserve VM instances for 1 or 3 years for a lower rate (you pay upfront or monthly but commit to that usage). AKS nodes are regular Azure VMs, so reserved instance discounts apply. Similarly, Azure’s Savings Plan for Compute or spot VMs can cut costs. Spot instances in AKS allow you to run nodes at deep discounts (sometimes 70-80% off) if your workloads can tolerate those nodes being evicted when Azure needs capacity. This is great for batch or test workloads. Keep in mind reserved instances lock you into a region/VM family, and spot instances have no SLA (they can disappear anytime), so use them appropriately.
- Add-on Services: Enabling features like Azure Monitor or Defender for Containers will increase your costs as described. For example, heavy logging can generate gigabytes of data – incurring Azure Monitor ingestion fees. It’s worth setting reasonable log retention policies or sampling to control those costs. Similarly, if you use an ingress controller that relies on Azure Application Gateway (with the AGIC add-on), then you’d pay for an Application Gateway instance which is a separate cost from the AKS cluster itself. Always account for any auxiliary Azure service that your AKS solution uses end-to-end.
- Service Level Agreement (SLA) Needs: If you require a certain uptime guarantee for your cluster’s API server, you’ll choose Standard or Premium tier. That introduces the fixed cost ($0.10 or $0.60 per hour). This is a small factor for large clusters (e.g., if you spend $10,000 on VMs monthly, an extra ~$72 is negligible), but for a tiny cluster, it can be significant. Decide based on environment: dev/test probably fine on free (save the $72), production likely on standard (worth the cost for peace of mind). Premium at $0.60/hr is usually only for specific compliance or support needs, due to the high multiplier.
By considering these factors, you can design your Kubernetes infrastructure to be cost-efficient. For instance, you might deploy in a cheaper region close to your users, use smaller nodes but scale out on demand, and turn on the Standard tier SLA for production clusters while keeping non-critical clusters on the Free tier to save money. The flexibility of AKS (and Azure’s pricing options) means you can tailor cost vs. performance according to your needs.
Estimating Costs with the AKS Pricing Calculator
To avoid surprises, it’s best to estimate your AKS costs upfront using the official Azure Pricing Calculator for AKS. This is a web-based tool where you can configure your prospective cluster and get a detailed cost breakdown. Here’s how to use it and what to consider:
- Open the Azure Pricing Calculator and find Azure Kubernetes Service (AKS) – You can go to the Azure Pricing Calculator website and add AKS to your estimate . This will present you with options to input your cluster configuration.
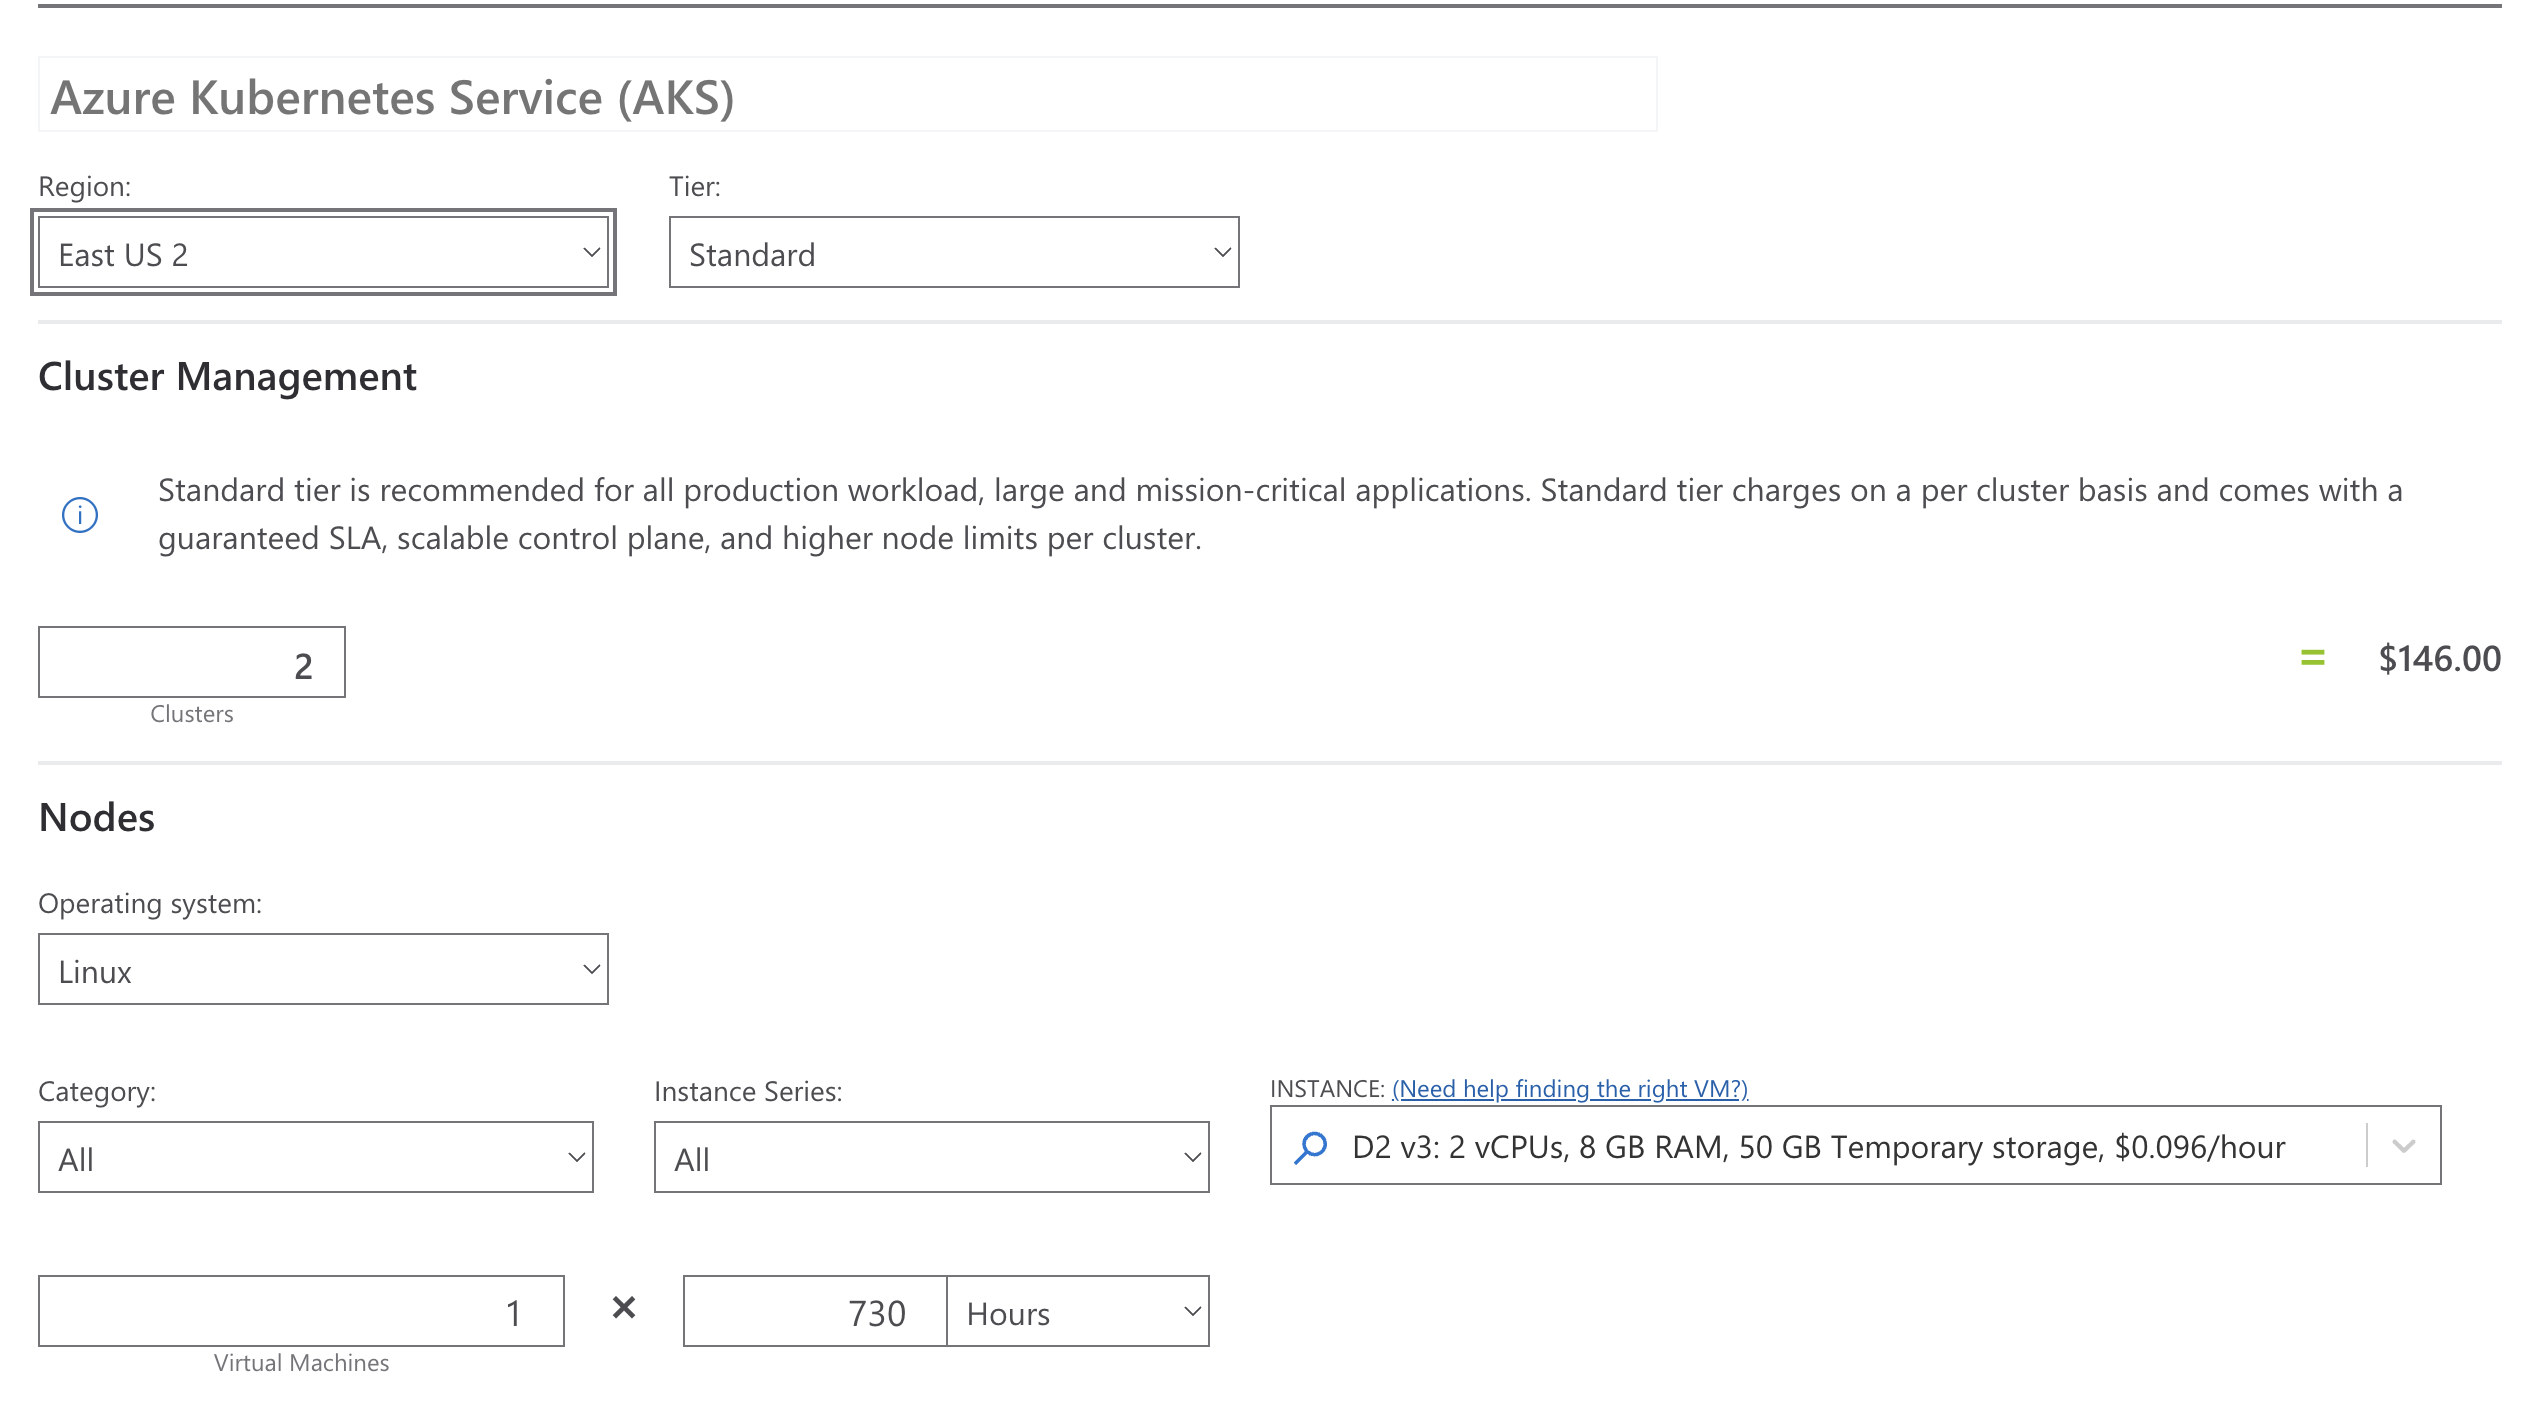
- Choose a Region – Select the Azure region where you plan to deploy. The calculator will automatically use the pricing for that region’s services. If you’re not sure, start with a region like “East US” (which often has lower prices) and remember that other regions might be slightly different in cost.
- Select the AKS Pricing Tier – The calculator will let you choose Free vs. Standard vs. Premium tier for the cluster management. If you choose Standard or Premium, it will add the respective $0.10/hr or $0.60/hr cost into the estimate (you’ll see a line item for “AKS Management” or similar). If you choose Free, that line will be $0.00 and you’ll just see costs for the nodes and other items. (Note: If using Premium tier for LTS, some calculators might model it as Standard tier + an LTS add-on cost. But the end result is the same total rate.)
- Configure Node Pools – Input the number of nodes and type of VM for your cluster’s node pool(s). For example, you might specify 3 nodes of Standard_D2s_v3. The calculator will show the hourly and monthly cost for those VMs in your chosen region. If you plan to use multiple node pools (perhaps one pool of 3 general-purpose nodes and another of 2 GPU nodes, for instance), you may need to add them separately or just calculate in pieces. The pricing calculator’s AKS section is somewhat simplified – it may assume a single node pool. For multiple pools, you can create multiple AKS entries in the calculator or just mentally sum the costs of each different node type.
- Add Associated Resources – The AKS calculator focuses on cluster management and nodes. Remember to add other resources your scenario will use:
- For a load balancer, you can add an Azure Load Balancer resource in the calculator (under Networking). For example, add one Standard Load Balancer and it will show ~$18/month (in US regions) plus an estimated data processing cost if you input some GB/month.
- For storage, you can add a Managed Disk resource. If you expect to use, say, two 100 GB standard SSD disks for volumes, add two Standard SSD Managed Disks of 100 GB. The calculator will show the monthly cost (which might be around $5 each, so ~$10 total in this example).
- If you plan on using Azure Container Registry, Azure Monitor, or other services, you can add those to the estimate as well (the calculator has entries for most Azure services). This way, you get a full picture of all costs related to your AKS deployment.
- Review the Monthly Estimate – The calculator will sum up the costs and show you an estimated monthly price. For example, let’s say you configured: Region East US, Standard tier AKS, 3 × Standard_D2s_v3 nodes, 1 Standard Load Balancer, and 2 × 100GB disks. Your breakdown might look like:
- AKS Standard tier management: ~$72 per month (the SLA fee).
- 3 × Standard_D2s_v3 VMs: ~$210 per month (assuming ~$70 each).
- 1 Standard Load Balancer: ~$18 per month (base cost).
- 2 × 100 GB Standard SSD Managed Disks: ~$10 per month (around $5 each).
- Adjust and Iterate – You can adjust parameters to see how costs change. Try increasing the node count, or changing to a larger VM size, or adding more disks – the estimate updates live. This is a great way to answer “what-if” scenarios (e.g., “What if we double our nodes?” or “What if we move to a cheaper region?”). The tool helps you identify the major cost drivers for your scenario.
- Export or Share – You can export the estimate or share a link with colleagues. This is useful for budgeting discussions. It’s often helpful to show an estimate with and without certain features (like with Free tier vs Standard tier, or with 10 nodes vs 20 nodes) to decide on a plan.
Remember that the pricing calculator provides estimates. Your actual bill may vary slightly due to usage fluctuations (for example, autoscaler might not run all nodes 24x7, or you might create additional cloud resources during experimentation). It’s wise to monitor your Azure cost breakdown once you deploy, using Azure Cost Management, to verify that costs align with expectations. Azure Cost Management can show you per-resource-group or even per-namespace (with AKS cost analysis) breakdowns of what you’re spending – so you can see how much is going to VMs vs. disks vs. LBs, etc., in your AKS environment.
Optimizing AKS Costs with Cloudchipr
.png)
AKS cost visibility shouldn’t end at the calculator. Cloudchipr’s Live Resources feature reads your AKS clusters directly and turns those pricing levers into real-time, actionable dashboards:
- Unified Cluster Dashboard: – Access a dedicated Kubernetes page in the sidebar that displays all your clusters across major cloud providers
- Cost-Efficiency Widgets – See key metrics at a glance including Idle and Reserved cost percentages.
.png)
- Detailed Resource Insights: – Click on any cluster to drill down into dedicated resource pages covering all the workload - Nodes, Namespaces, Pods, DaemonSets, StatefulSets, and Jobs. Each resource view provides interactive tables and drawers with critical details and charts.
.png)
These insights are delivered in the same unified Cloudchipr console you already use for Azure cost monitoring, eliminating context-switching and manual exports.
When your live environment drifts from the assumptions in the AKS pricing calculator—whether an extra load balancer appears, node counts spike, or autoscaler limits change—Cloudchipr immediately surfaces the variance, giving your team the information needed to act before costs escalate.
Conclusion
Azure AKS pricing might initially look like a tangle of SKUs and variables, but it’s essentially about paying for the capacity and features you need, when you need them. To recap, if you use the Free tier, you get a fully functional managed Kubernetes cluster and only pay for the nodes, storage, and networking you consume – the control plane is free . As you move to Standard tier, you’re paying a small premium (ten cents an hour) for an uptime guarantee and a beefier control plane , which is a smart trade-off for production systems. And for those rare cases that demand extended support, the Premium tier offers that safety net at a higher fixed cost.
When estimating total spend, remember to include every paid component—virtual-machine nodes, load balancers, managed disks, outbound data, and any monitoring add-ons. The Azure Pricing Calculator is the best place to model these expenses up front and play “what-if” scenarios around region, VM size, or scaling strategy.
After deployment, tools such as Cloudchipr extend that cost visibility from “one-time estimate” to “continuous reality.” By reading your AKS clusters directly, Cloudchipr highlights idle nodes, unused reservations, and new resources the moment they appear—so you can keep budgets aligned with your original assumptions.
Ultimately, AKS lets you focus on running applications instead of managing masters, and you pay only for what you use. Combine a clear understanding of the AKS pricing tiers with the Azure calculator—and ongoing insights from Cloudchipr—and you’ll keep your Kubernetes workloads both performant and cost-effective. Happy clustering, and may your deployments stay smooth and your costs predictable!