Kubernetes Cost Optimization: Strategies, Tools & Best Practices for 2026
.png)
Introduction
Kubernetes delivers powerful orchestration, but without careful management it can drive up cloud bills quickly. As clusters grow to meet demand, idle or misallocated resources multiply and costs escalate. Inefficient resource utilization becomes a leading factor in unnecessary spending. The key is to balance performance with spending: only run as much infrastructure as needed, and use it efficiently. This post covers common Kubernetes cost optimization challenges and actionable strategies—on AWS, Azure, and GCP—to automate and reduce spending. We’ll discuss autoscaling, rightsizing, bin-packing, cluster management, tools (native and third-party), and real-world examples of savings.
The Cost Challenges of Kubernetes
Kubernetes clusters incur costs on multiple fronts. A managed control plane (like EKS or AKS) often has a fixed fee, but the bulk of spend comes from the worker nodes (VM instances), storage, and network. Unlike traditional servers, containers can spin up hundreds or thousands of times per day, leading to resource sprawl if not trimmed. Common challenges include:
- Over-provisioning: Reserving more CPU/memory (and nodes) than needed is a leading factor in creating unnecessary costs. Idle pods or oversized node pools waste money.
- Idle Resources: Unused nodes, forgotten volumes, or old clusters (e.g. test/dev) rack up bills even when workloads are low. For example, AWS notes that terminating unnecessary pods during off-hours can dramatically cut costs.
- Complex Pricing Models: Cloud providers offer many instance types, purchase options (On-Demand, Reserved, Spot/Preemptible), and discounts. Picking the wrong VM family or forgetting to use spot instances can mean paying full price for capacity you hardly use.
- Dynamic Workloads: Fluctuating traffic (e.g. e-commerce spikes) means clusters must grow and shrink to match demand, or else waste capacity. However, without automated scaling, clusters may stay at peak size all the time.
- Lack of Visibility: Kubernetes’ abstraction of containers makes it harder to see where costs accumulate. It’s easy to lose track of which namespace or deployment is spending the most on compute, storage, or idle resources.
The goal of cost optimization is to right-size infrastructure to match demand and eliminate waste. Efficient usage not only saves money but frees budget for innovation and growth.
Autoscaling: Align Supply with Demand
One of the primary ways to reduce waste is to autoscale. Kubernetes supports autoscaling at both the application layer (pods) and infrastructure layer (nodes), allowing clusters to grow and shrink automatically:
Horizontal Pod Autoscaler (HPA)

The HPA continuously monitors metrics (CPU/memory or custom metrics via the Metrics API) and scales deployments accordingly. It adds and deletes Pods replicas when usage crosses thresholds. To optimize HPA:
- Set sensible target utilization (e.g. 70% CPU) to maintain a buffer. Too large a buffer means waste; too small can cause overloads.
- Ensure the Metrics Server is running and healthy, as HPA depends on it.
- Tune your application’s startup/shutdown times (faster startup means HPA can respond quicker) and use readiness probes so that new pods are ready to serve traffic before switching load.
Vertical Pod Autoscaler (VPA)

The VPA observes pods over time and suggests adjustments to their CPU/memory requests. Setting correct requests/limits is vital: if they’re too high, resources are overprovisioned (waste); if too low, pods may throttle or OOM. The VPA observes Pods over time and gradually finds the optimal CPU and memory resources required. In practice, VPA can be set to either automatically update pod specs or just provide recommendations for developers. It’s especially useful for workloads with fluctuating resource use.
Tip: Don’t use VPA on the same resource metric that HPA scales on (e.g. CPU) simultaneously — they can conflict. A common approach is HPA on CPU and VPA on memory (or vice versa), or use VPA only for non-HPA-managed deployments.
Cluster Autoscaler (CA)

At the infrastructure level, the Cluster Autoscaler watches for pods that cannot be scheduled due to capacity constraints, and it increases the number of nodes to accommodate them. It also identifies nodes where pods can be consolidated: if a node has pods that can fit on other nodes, it will drain that node and delete it (scaling in). In Kubernetes on AWS, for example, this means the CA updates the EC2 Auto Scaling Group to add or remove instances. This way, instance hours scale with actual workload needs.
CA may require tuning for multi-AZ clusters (AWS recommends one ASG per zone so scaling is zonally aware) and for handling pods with local storage or daemon sets. The net result, however, is significant cost savings: by removing underutilized nodes, you stop paying for empty VMs.
Both AWS and Azure documentation emphasize autoscaling as a cornerstone of cost control. The bottom line: ensure your workloads can scale in and out automatically, and your nodes will follow suit.
Node Auto-Provisioning
Some managed Kubernetes services (like GKE and AKS) support auto-provisioning of node pools. For example, GKE’s Node Auto-Provisioner can dynamically create new node pools with the optimal VM types based on pending pods’ requirements. Azure’s Node Autoprovisioning similarly decides the optimal VM configuration based on pending pod resource requirements to run workloads in the most cost-effective way.
Rightsizing: Match Resources to Workloads

Autoscaling handles when to add or remove capacity, but what size capacity to use is equally important. Rightsizing means tailoring resources (pod requests/limits and VM sizes) to actual needs.
- Resource Requests & Limits: Kubernetes scheduling uses pod requests to decide placement, and limits to cap usage. If you request far more than you use, nodes appear “full” with reserved resources while pods sit idle, causing new nodes to spin up unnecessarily. Conversely, under-requesting can cause throttling and instability. Monitoring actual usage (via tools like Prometheus or Metrics Server) lets you adjust requests. Over time, you should “right-size” pods so they ask for just what they need. VPA can help by recommending adjustments based on historical usage. As the Azure documentation warns, “requests and limits that are higher than actual usage can result in overprovisioned workloads and wasted resources”.
- Node Sizing: Choose VM families that fit your workload. For example, if you have many moderate-load pods, a few large nodes might do the job (saving on per-VM overhead); or vice versa, if you have spiky CPU jobs, CPU-optimized VMs help. Experiment with different instance types. Cloud providers offer specialized SKUs: Azure’s AKS highlights Arm64 nodes that can be “50% better price-performance” for certain workloads. Google’s GKE recommends right-sizing too: its autoscalers support E2 family nodes for cost-sensitive tasks, and preemptible (Spot) instances for batch jobs (up to 91% cheaper).
- Purchase Options: For long-running baseline workloads, use Reserved Instances or Savings Plans. AWS and Azure can cut compute costs by 50%–70% with reservations. For example, Azure Reservations offer up to 72% discount on committed VMs. Use these for steady parts of your cluster, and autoscale / spot for the variable parts.
Bin-Packing and Scheduling Efficiency
Once resources are right-sized, you want to use them efficiently. “Bin packing” refers to packing containers (bins) tightly onto nodes (boxes) to minimize the number of boxes used. Effective bin packing reduces total nodes needed, saving cost. However, it must be balanced with reliability and performance.
Key Kubernetes features help with bin-packing:
- Pod Resource Requests/Limits: When every pod specifies realistic requests, the Kubernetes scheduler can pack pods together optimally. The docs note that “resource requests and limits let you configure the scheduler to consider the available resources on each node when making scheduling decisions”. Pods that accurately declare their needs allow the scheduler to place them on nodes without leaving large wasted slots.
- Affinity/Anti-Affinity and Topology Spread: Control pod placement to respect high availability or locality while still packing effectively. Pod affinity can co-locate related pods on the same node (useful for local communication), whereas anti-affinity can spread pods across nodes or zones for redundancy. Using Kubernetes’ Pod Topology Spread Constraints ensures pods are distributed (for example, one per availability zone) to avoid bottlenecks. These knobs help avoid “all eggs in one basket” pitfalls that over-packing can introduce.
- Priority and Preemption: Set pod priorities so critical workloads get scheduled first. Low-priority batch jobs can be preempted or run only when capacity is free.
- Graceful Eviction and Draining: Regularly evict or drain nodes (e.g. during maintenance or scale-in) so the cluster can rebalance workloads and free up full nodes for shutdown.
In practice, good scheduling means consolidating pods without causing resource contention. Use affinity, anti-affinity, and resource guarantees to strike a balance between high utilization and resilience.
Efficient Cluster Management and Cleanup
Beyond autoscaling and scheduling, ongoing management is critical:
- Idle and Orphaned Resources: Regularly audit and clean up unused infrastructure components to avoid unnecessary charges. Common culprits include:
- Idle node pools: Node groups that remain active even when no workloads are scheduled on them.
- Unattached volumes: PersistentVolumes or cloud provider disks (like AWS EBS, Azure Disks, or GCP Persistent Disks) that are no longer mounted but still incur storage costs.
- Unused load balancers: Services of type LoadBalancer that are no longer in use but still provision and retain cloud load balancer instances.
- Stale namespaces and resources: Forgotten dev/test environments or leftover workloads that continue to consume resources (e.g. running pods, PVCs, ConfigMaps).
- Scheduled Scaling: For predictable cycles (like nights/weekends), proactively scale down. The AWS example suggests down-scaling pods that aren’t needed after hours. Many teams script the HPA or Cluster Autoscaler settings (or use tools) to shrink clusters during known lulls.
- Spot and Preemptible Instances: Use Spot (AWS), Preemptible (GCP), or Azure Spot VMs for fault-tolerant workloads. These are much cheaper but can be reclaimed with little notice. Ideal candidates include batch jobs, non-critical services, or as a compute tier fallback. For instance, Azure notes Spot VMs “allow you to take advantage of unutilized Azure capacity with significant discounts (up to 90%)” for dev/test or interruptible workloads. GKE Spot VMs can be up to 91% cheaper.
- Utilize Discounts and Commitments: Alongside reservations, explore cloud-specific savings. AWS Savings Plans, GCP Committed Use Discounts, and Azure’s spot/reservation combos can slash costs for baseline capacity. Always match workloads with the right contract.
- FinOps and Budgeting: Implement financial controls. Tag and label Kubernetes resources (namespaces, clusters, apps) and export billing at that granularity. Use budgets/alerts (AWS Budgets, Azure Cost Alerts, GCP Billing Budgets) so teams know when costs spike.
Tools for Kubernetes Cost Optimization
Effectively managing Kubernetes costs requires leveraging a combination of native tools, cloud provider solutions, and third-party platforms. Below is an organized overview:
Kubernetes Native Tools
- Metrics Server: A lightweight cluster add-on that collects resource usage data (CPU and memory) from each node and pod, exposing it via the Metrics API. This data is essential for autoscaling mechanisms like Horizontal Pod Autoscaler (HPA) and Vertical Pod Autoscaler (VPA).
- Horizontal Pod Autoscaler (HPA): Automatically scales the number of pod replicas in a deployment or replica set based on observed CPU utilization or other select metrics.
- Vertical Pod Autoscaler (VPA): Adjusts CPU and memory requests for containers in pods to match actual usage, helping to optimize resource allocation.
- KEDA (Kubernetes Event-Driven Autoscaling): Extends Kubernetes autoscaling capabilities by allowing applications to scale based on external event sources, such as message queues or databases.
Cloud Provider Tools
AWS (Amazon EKS)
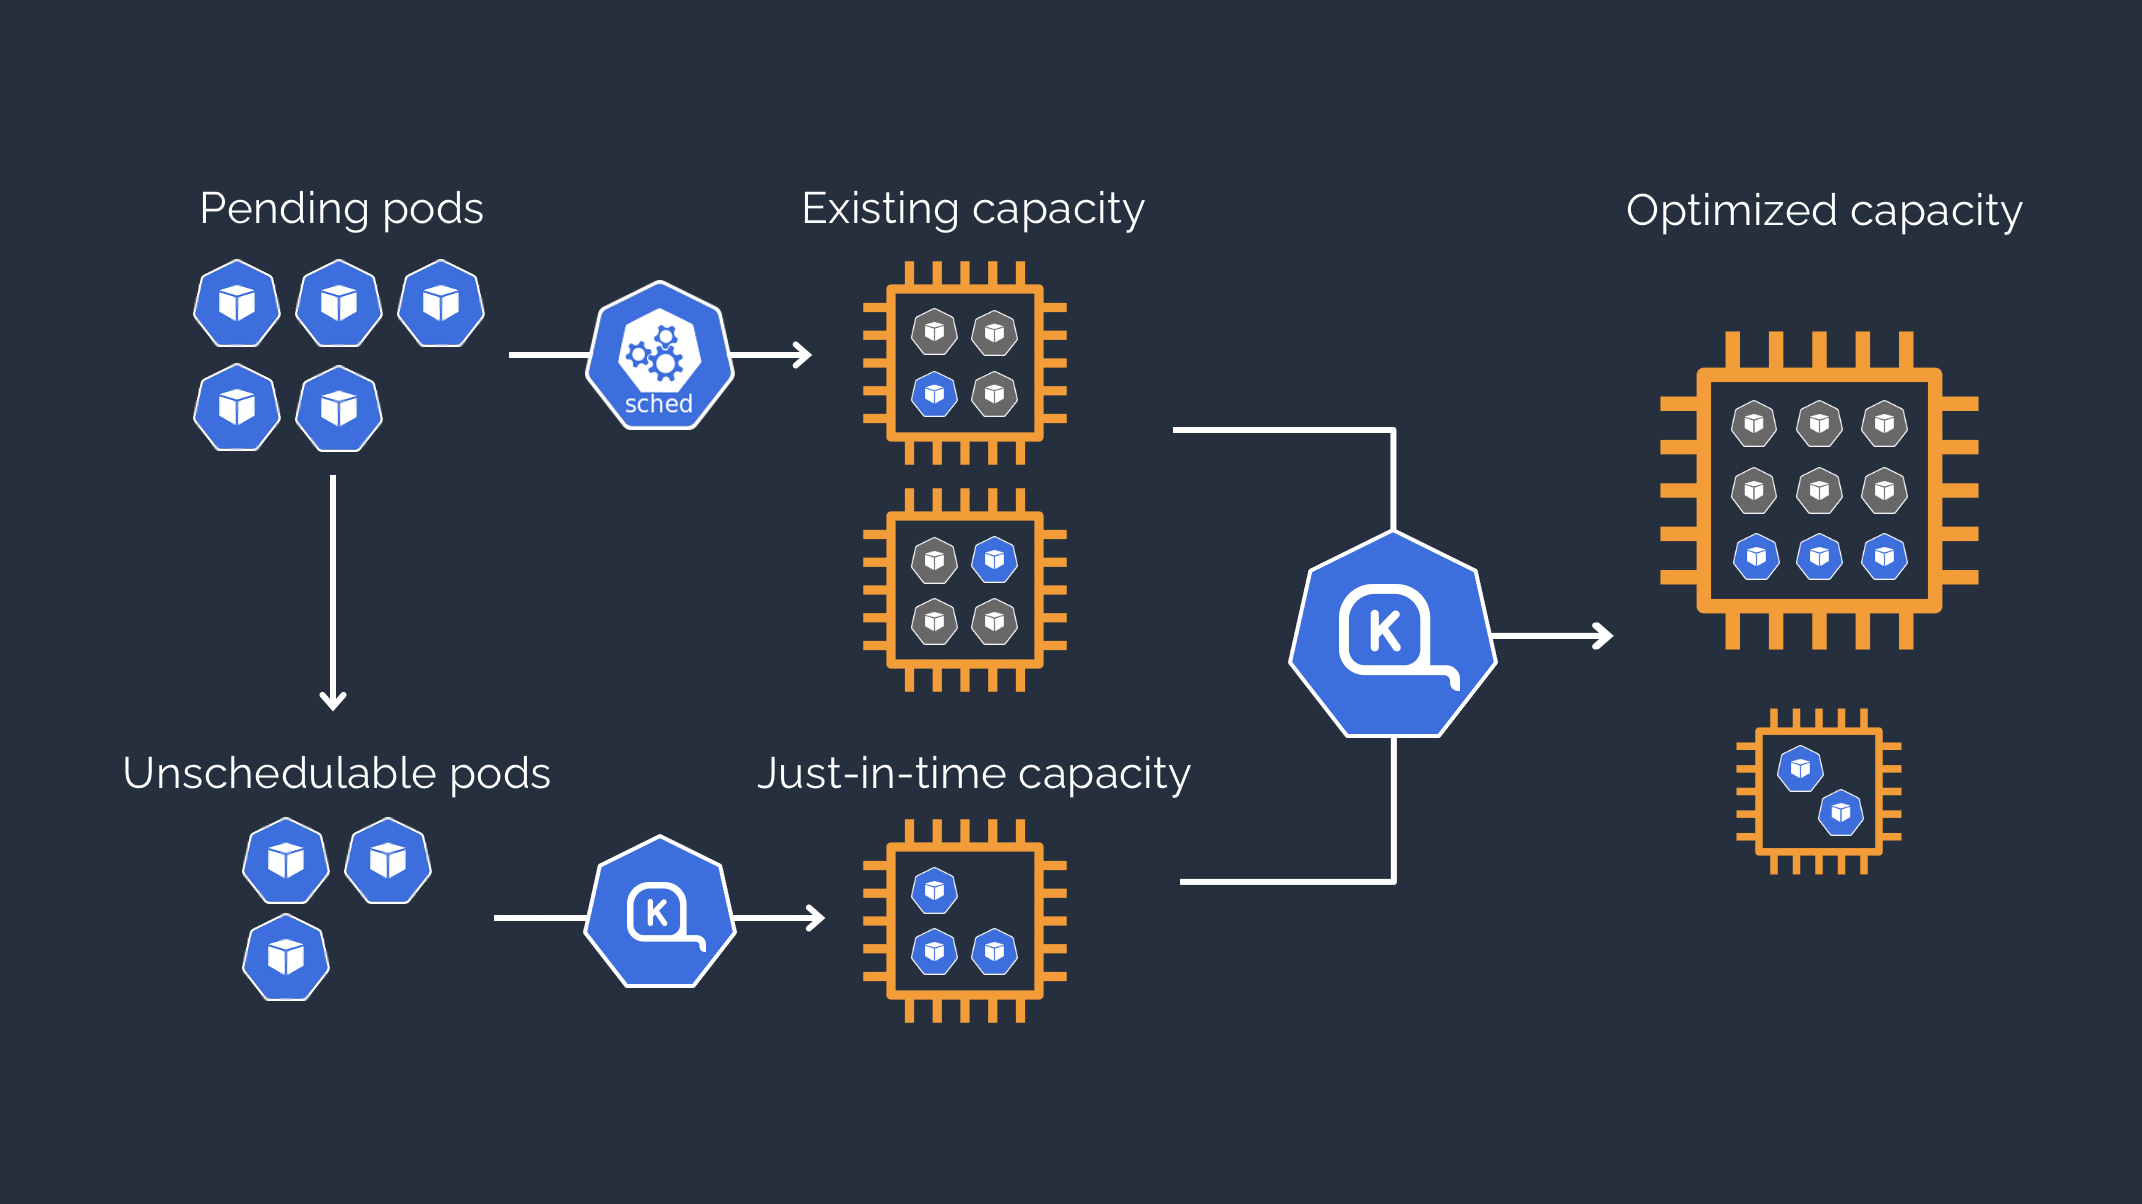
- Karpenter: An open-source autoscaler that dynamically provisions and deprovisions nodes in response to unschedulable pods, optimizing for cost and performance.
- Cluster Autoscaler: Adjusts the number of nodes in a cluster based on pending pods, scaling node groups within predefined limits.
- EKS Auto Mode: Builds upon Karpenter to provide automated scaling without the need to manage node groups or Karpenter installations.
- Monitoring & Cost Management: Utilize CloudWatch Container Insights for metrics and logs, AWS Cost Explorer for cost allocation and usage reports, and AWS Trusted Advisor and Compute Optimizer for recommendations on rightsizing and eliminating unused capacity.
Azure (Azure Kubernetes Service - AKS)
- Cluster Autoscaler: Automatically adjusts the number of nodes in a node pool based on pending pods, scaling up when pods can’t be scheduled and scaling down when nodes are underutilized.
- Spot Node Pools: AKS supports spot instances for cost-effective compute options, suitable for interruptible workloads.
- Monitoring & Cost Management: Use Azure Monitor and Log Analytics for insights into cluster performance and health, Azure Cost Management and Azure Advisor for cost analysis and optimization recommendations, and Azure Policy to enforce governance and compliance across AKS environments.
GCP (Google Kubernetes Engine - GKE)
- Node Auto-Provisioning (NAP): Automatically creates and manages node pools based on workload requirements, such as CPU, memory, and GPU needs, reducing resource waste.
- Preemptible VMs: Provide cost-effective compute options suitable for fault-tolerant workloads, offering significant savings over standard VMs.
- Monitoring & Cost Management: Leverage Cloud Monitoring and Logging for observability into cluster operations, GCP Billing Reports for cost breakdowns, and GCP Recommender for resource optimization suggestions.
Third-Party Tools
- Cloudchipr: A SaaS FinOps platform that offers unified, real-time views of multi-cloud Kubernetes clusters. It surfaces key metrics, such as idle versus reserved cost percentages per cluster, and identifies underutilized workloads, highlighting opportunities for cost savings.
- Kubecost: Provides real-time cost visibility and insights for Kubernetes environments, helping teams monitor and manage their cloud costs effectively. It offers granular visibility into Kubernetes resources, enabling cost allocation by namespace, deployment, and service.
- Other Tools: Solutions like Cloudability (by VMware), Spot by NetApp, and open-source combinations of Prometheus and Grafana can also aid in visualizing utilization and managing costs. The choice of tool depends on specific organizational needs and scale.
By integrating these tools into your Kubernetes operations, you can achieve more effective cost management and cost optimization across various cloud environments.
Kubernetes on AWS, Azure, and GCP
Autoscaling: HPA, VPA, and KEDA
Before diving into individual providers, it’s important to note that Horizontal Pod Autoscaler (HPA) and Vertical Pod Autoscaler (VPA) are built-in Kubernetes features and work across all environments—whether you’re running on AWS, Azure, GCP, or on-prem. They help adjust pod replica counts and resource requests based on usage metrics.
Similarly, KEDA (Kubernetes Event-Driven Autoscaling) is an open-source, cloud-agnostic scaler that adds support for event-based triggers (e.g. queue length, database changes, Kafka lag). It integrates seamlessly with HPA and can be used across EKS, AKS, GKE, or any Kubernetes cluster.
AWS (EKS)
Amazon EKS charges $0.10 per hour for the control plane. Worker nodes, storage, and networking drive most of the cost.
Cost Optimization Tips:
- Use Karpenter (preferred) or Cluster Autoscaler to dynamically scale node groups.
- Mix Spot Instances with On-Demand for better cost efficiency.
- Apply Savings Plans or Reserved Instances for predictable, long-lived workloads.
- Leverage HPA, VPA, and optionally KEDA for intelligent workload scaling.
- Use CloudWatch Container Insights or third-party tools like Cloudchipr for resource-level cost tracking.
To learn more about pricing structure and cost factors in EKS, see our detailed EKS Pricing Breakdown.
Azure (AKS)
AKS has no control plane fee, making it appealing for cost-sensitive environments. The main cost drivers are compute, storage, and data transfer.
Cost Optimization Tips:
- Enable Cluster Autoscaler for right-sized capacity.
- Use Spot Node Pools for stateless or batch workloads (up to 90% savings).
- Apply Azure Reservations for consistent workloads.
- Leverage HPA, VPA, and optionally KEDA for intelligent workload scaling.
- Monitor with Azure Monitor, and manage budgets via Cost Management + Billing.
For a closer look at how AKS handles cost and what to watch for, read our AKS Pricing Guide
Google Cloud (GKE)
GKE includes robust autoscaling out of the box and supports granular pricing based on usage.
Cost Optimization Tips:
- Enable Node Auto-Provisioning to let GKE automatically create node pools tailored to workloads.
- Use Preemptible VMs for non-critical jobs (up to 91% savings).
- Apply HPA and VPA to manage pod scaling; combine with KEDA if event-driven autoscaling is needed.
- Choose efficient instance types for general-purpose workloads.
- Monitor with Cloud Monitoring, and optimize spend using Billing Budgets and Recommender
You can also explore Google’s own recommendations in this GKE cost-saving strategies from Google guide.
No matter which cloud you’re on, the foundation of Kubernetes cost optimization is the same: scale intelligently, rightsize continuously, and automate wherever possible.
How Cloudchipr Enhances Kubernetes Cost Optimization
.png)
Cloudchipr is a cloud FinOps platform that provides real-time visibility into Kubernetes resource utilization and costs across AWS, Azure, and GCP environments. It offers comprehensive insights to help teams identify inefficiencies and optimize their Kubernetes deployments effectively.
Key Features:
- Unified Multi-Cloud Cluster Overview: Monitor all your Kubernetes clusters in a single dashboard, regardless of the cloud provider. Cloudchipr presents key metrics such as idle and reserved resource percentages, enabling quick identification of underutilized clusters or node pools.
.png)
- Detailed Resource Analysis: Dive deep into resource usage with granular reports on nodes, namespaces, pods, daemonsets and more. Visualize CPU and memory usage over time to detect over-provisioned deployments and make informed scaling decisions.
.png)
- Underutilization Alerts: Receive proactive notifications for resources that consistently use a fraction of their allocated capacity. This feature aids in promptly addressing inefficiencies, allowing for timely rightsizing or decommissioning of redundant workloads.
Ready to optimize your Kubernetes costs? Sign up for a 14-day free trial and experience Cloudchipr’s capabilities firsthand.
Actionable Best Practices
To tie everything together, here are concrete steps for Kubernetes cost optimization:
- Enable Autoscaling Everywhere: Use HPA/VPA on your deployments, and Cluster Autoscaler on all node pools. This ensures supply matches demand with minimal manual intervention.
- Set Realistic Resource Requests: Monitor actual pod usage and adjust requests/limits accordingly. Consider using VPA in recommendation mode first, then apply changes. Over time, this right-sizes pods so nodes aren’t wasting capacity.
- Implement Bin-Packing Policies: Use affinity/anti-affinity rules, topology spreads, and PodDisruptionBudgets to control placement. Review cluster utilization and evict pods to defragment nodes if needed.
- Leverage Spot/Reserved Instances: Use spot/preemptible VMs for non-critical and batch workloads (with fallbacks). Commit to reserved instances or savings plans for baseline capacity (production clusters).
- Clean Up Idle Resources: Automate teardown of dev/test clusters when idle (e.g., use cluster-autoscaler with short node-lifecycle or manually delete). Periodically audit for unattached disks, old PVs, idle LoadBalancers, or zombie namespaces.
- Tag and Allocate Costs: Label everything (team, environment, app) and use a cost tool to allocate cloud spend to these tags. Set budgets and alerts by team/namespace. Cloudchipr or Kubecost can notify you when a namespace exceeds its budget.
- Adopt FinOps Practices: Encourage cross-team collaboration on costs. For example, developers should choose node sizes based on cost-performance knowledge, and maybe self-serve scale-up/down under guardrails. Use reserved pricing commitments that align with actual usage patterns.
- Optimize Storage and Networking: Use provisioned throughput or caching appropriately. Delete unused storage (or snapshots). Azure’s AKS guides recommend reviewing storage and backup costs, as orphaned volumes can add up.
- Review Continuously: Cost optimization is not one-and-done. Regularly analyze reports (e.g. monthly) and iterate. Even moving to a new Kubernetes version can change efficiency (better scheduler, new VM types). Platforms like Cloudchipr enable continuous feedback loops by combining near real-time cost data with actionable recommendations.
Conclusion
Kubernetes cost optimization is an ongoing journey, blending technology and process. By employing autoscaling (horizontal, vertical, and cluster), rightsizing resources, packing efficiently, and using the right cloud purchase models, teams can significantly lower their bills without sacrificing performance. Automation is key: let automated Kubernetes cost optimization do the heavy lifting of adjusting infrastructure to real demand.
Native Kubernetes features (Metrics Server, HPA, VPA, Cluster Autoscaler) are powerful first steps. Add financial guardrails (budgets, alerts, reserved instances) and dedicated cost tools (like Cloudchipr) to gain visibility. Regularly review and iterate: what was optimized last quarter may need tweaking today as workloads change.
In practice, organizations following these Kubernetes cost optimization strategies often see dramatic ROI – examples include multi-fold reductions in cloud spend on EKS/AKS/GKE. The result is a cloud-native environment that is not only agile and scalable, but also cost-efficient and sustainable.
Key Takeaways: Plan capacity to match actual workload, use autoscalers (HPA/VPA/Cluster Autoscaler) to automate scaling, clean up idle resources, leverage cloud discounts (Spot/Preemptible, reservations), and monitor everything with the right tools. With these best practices, you can master Kubernetes cost optimization on AWS, Azure, GCP – saving money and maximizing resource efficiency.