Comprehensive Guide to AWS Savings Plans: Everything You Need to Know
.png)
Introduction
In today’s cloud era, organizations seek every opportunity to optimize costs without sacrificing performance. AWS Savings Plans have emerged as a go-to mechanism for achieving significant savings on AWS compute services while retaining flexibility. When AWS introduced Savings Plans, it transformed how customers plan cloud spending, offering discounts up to 72% in exchange for committed usage. But how do AWS Savings Plans work, and how do they compare to the long-standing Reserved Instances? In this comprehensive guide, we’ll have AWS Savings Plans explained in detail – covering what they are, the types available, how they differ from Reserved Instances, how to choose and purchase them, ways to monitor and automate Savings Plans, and all relevant quotas and restrictions.
What are AWS Savings Plans?
AWS Savings Plans are a flexible pricing model that offer lower prices on AWS compute usage in exchange for a commitment to a consistent amount of usage (measured in $/hour) for a 1- or 3-year term. In simpler terms, a Savings Plan is like a subscription or contract: you agree to use a certain amount of compute power continuously, and AWS gives you a discounted rate. This commitment can significantly reduce your costs compared to On-Demand pricing – in fact, Savings Plans can save you up to 72% on eligible workloads.
Key characteristics of AWS Savings Plans include:
- Commitment Period: You commit to a usage amount for one or three years. (AWS defines one year as 31536000 seconds and three years as 94608000 seconds for consistency.) During this term, you pay the reduced Savings Plan rates for your usage.
- Locked-in Rates: Once you purchase a plan, the price per unit of usage is locked for the entire term. This protects you from price fluctuations. You can choose to pay All Upfront, Partial Upfront, or No Upfront – the payment option doesn’t affect the rate, just how you pay over time.
- Monetary Commitment, Not Specific Resources: Unlike Reserved Instances which are tied to specific instance configurations, a Savings Plan is a monetary commitment (e.g., $10 of compute usage per hour). AWS automatically applies that commitment to any eligible usage across services, regions, instance types, etc.
- Automatic Savings: If you have an active Savings Plan, it automatically applies to your eligible AWS usage to reduce your on-demand costs. You don’t have to manually allocate it – as long as you’re using relevant services, the Savings Plan will cover the usage up to your commitment amount.
- Manageable via Cost Explorer: AWS Cost Explorer provides tools to manage Savings Plans – including recommendations, performance reporting, and budget alerts – to help you track and optimize your Savings Plans usage.
Think of a Savings Plan like a discounted power plan from your utility company: commit to use a certain amount of power continuously, and get a cheaper rate per unit. If your usage exceeds your commitment, the excess is simply billed at normal on-demand rates, but your committed portion always enjoys the lower rate.
What types of AWS Savings Plans are available?
AWS offers three types of Savings Plans to fit different needs:
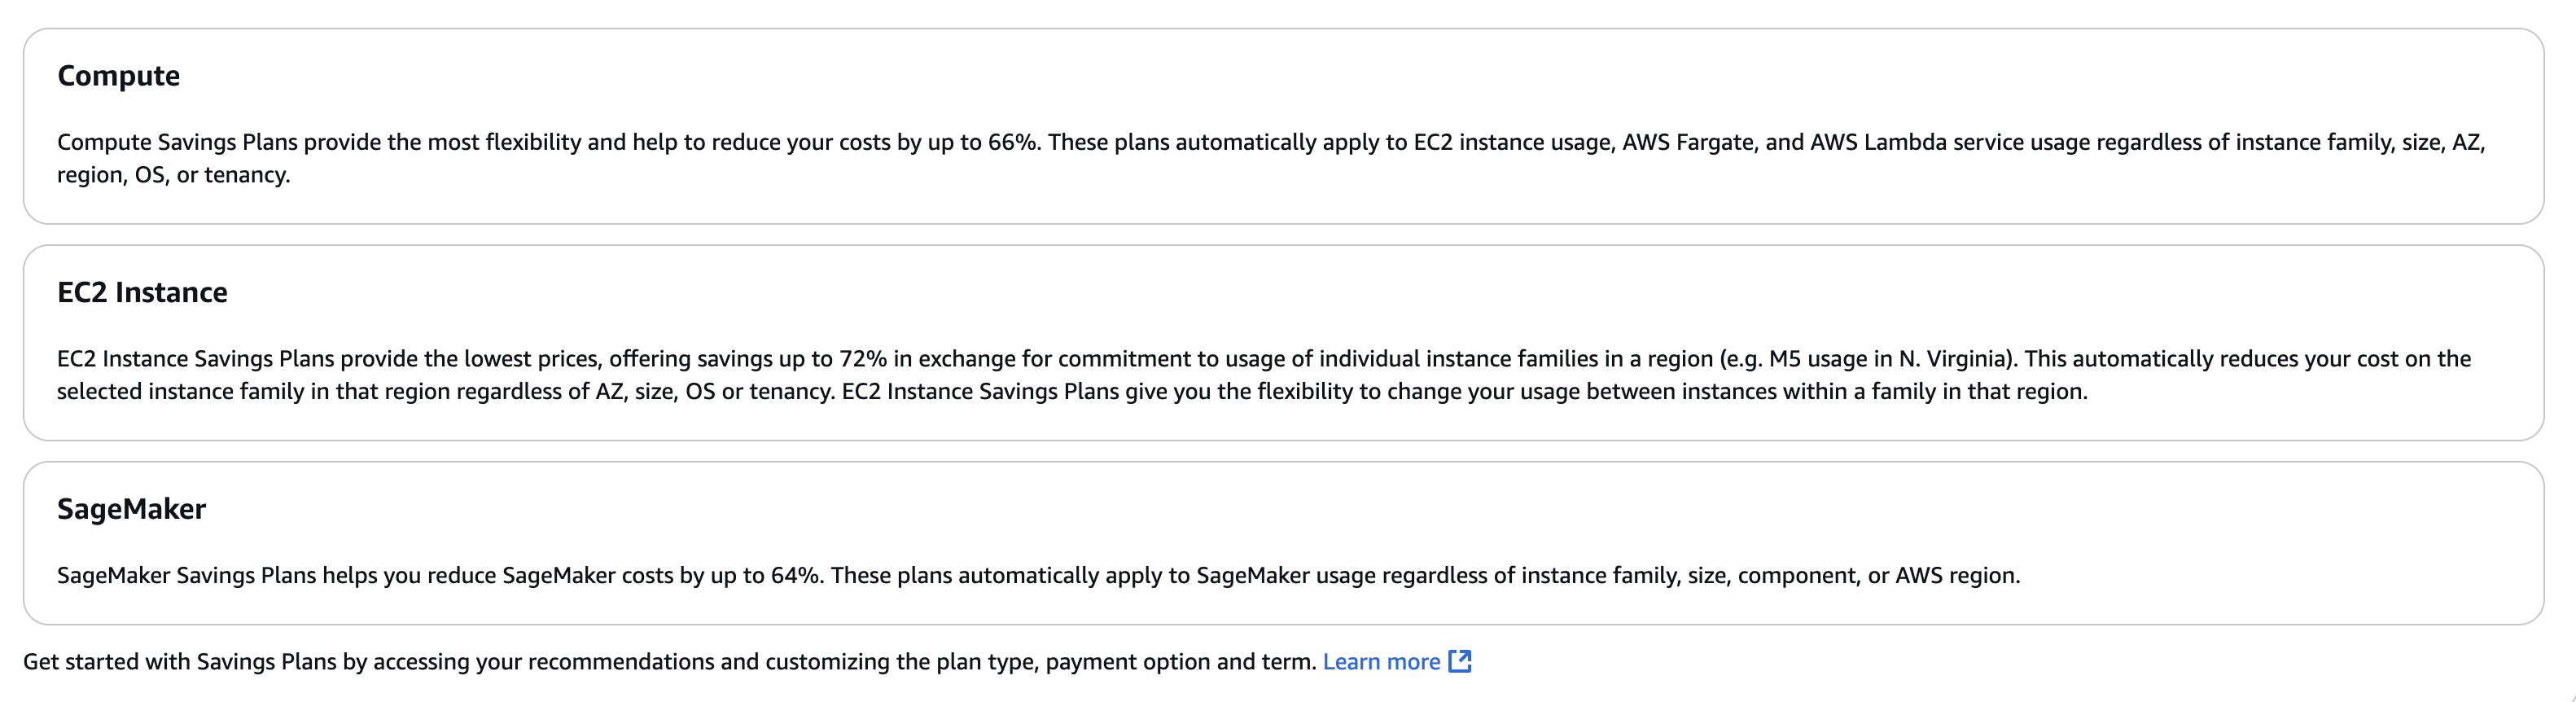
- Compute Savings Plans – The most flexible plan, covering a wide variety of compute usage. Compute Savings Plans apply to any instance type in any region, regardless of instance family, size, OS, or tenancy, and even cover serverless and container services like AWS Fargate and AWS Lambda. In exchange for this flexibility, Compute Savings Plans offer up to 66% off on-demand rates. This plan is ideal if you want maximum freedom to change instance types or move workloads between regions and still benefit from savings.
- EC2 Instance Savings Plans – A plan specific to Amazon EC2 usage in a particular instance family and region. For example, you might commit to an “m5” family in us-east-1. In return, you get the deepest savings – up to 72% off – but only for that instance family in the chosen region. The plan price applies regardless of size (e.g., it covers m5.large, m5.xlarge, etc. in that family), OS, or tenancy within that family and region. This is suited for steady-state workloads where you know you’ll use a specific instance family (similar to Standard RIs in scope).
- SageMaker AI Savings Plans – A plan dedicated to Amazon SageMaker machine learning instances. It provides up to 64% off SageMaker instance usage, applying to any SageMaker instance type (ML instance families and sizes) in any region. It covers all SageMaker instance roles (e.g., notebook, training, inference) and offers flexibility to switch instance types or move between regions for SageMaker workloads. This plan is useful if you heavily use SageMaker and want to commit to those ML workloads.
Each type automatically applies to the eligible usage it covers. For example, if you purchase a Compute Savings Plan, you could move an application from running on EC2 instances to AWS Fargate or AWS Lambda and still continue to use your plan’s discounted rates on that usage. By contrast, an EC2 Instance Savings Plan is less flexible (locked to one family/region) but gives a bigger discount for that specific use case.
Note: All Savings Plans are commitments that cannot be altered or canceled mid-term. If your needs change, you can always purchase additional Savings Plans to cover new usage, but the terms of an existing plan are fixed for its duration. And while Savings Plans cover pricing, they do not reserve capacity. (In other words, unlike certain EC2 Reserved Instances, Savings Plans don’t guarantee instance capacity in a specific AZ. If you need capacity reservations, you can use On-Demand Capacity Reservations alongside Savings Plans.)
AWS Savings Plans vs. Reserved Instances (RI)
.png)
One common question is how AWS Savings Plans compare to Reserved Instances – essentially AWS Savings Plans vs. RI. Both offer discounted pricing in exchange for commitment, but there are important differences in flexibility and coverage.
Compute Savings Plans were introduced as a more flexible alternative to Amazon EC2 Reserved Instances, with similar cost savings but far less specificity. With a Savings Plan, you commit to a dollar-per-hour spend on compute, whereas a Reserved Instance is a commitment to a specific instance configuration (instance type, region/AZ, platform, and tenancy). Here’s a breakdown of key differences:
- Scope of Coverage: Savings Plans (especially Compute SP) automatically apply to any eligible compute usage – across instance families, sizes, OS, tenancy, and even across regions in the case of Compute SP. EC2 Instance SP are narrower (one family in one region) but still flexible within that scope (any size/OS/tenancy in the family). In contrast, a Standard EC2 Reserved Instance price applies only to the exact instance type and region you purchase (though regional RIs do allow any size within the family). Convertible RIs offer some flexibility to change instance attributes, but require manual exchanges and are not automatic.
- Services Covered: Reserved Instances exist mainly for EC2 (and separate RIs for other services like RDS, Redshift, etc.), whereas Savings Plans cover multiple services with one commitment. For example, a Compute Savings Plan covers EC2 instances, AWS Lambda functions, and AWS Fargate containers under one plan – something RIs alone cannot do. This makes Savings Plans a unified savings mechanism for AWS compute usage across services.
- Flexibility: Savings Plans do not require any exchanges or modifications to shift your savings to a different instance type or region – the discounts follow your usage dynamically. With RIs, if you want to change (say from one instance family to another, or move regions), you have to modify or exchange convertible RIs (if you purchased that type) or buy new RIs. AWS Savings Plans automatically give you the best applicable rate for your actual usage without manual intervention.
- Capacity Reservations: One feature RIs have (for zonal RIs) is the ability to reserve capacity in a specific Availability Zone. Savings Plans do not provide capacity reservation – they are purely a pricing discount. If you need guaranteed capacity, you might still use Zonal RIs or On-Demand Capacity Reservations in conjunction with a Savings Plan. The Savings Plan will still apply its discount to any usage that matches, even if that usage is in a capacity reservation.
- Term and Payment Options: Both Savings Plans and RIs offer 1-year or 3-year terms and options to pay all upfront, partially upfront, or nothing upfront with monthly payments. In both cases, longer terms and upfront payments maximize your discount. Neither can be canceled (Standard RIs and all Savings Plans are commitment for the term – though AWS does allow limited RIs to be sold on a marketplace and Savings Plans to be returned within 7 days in certain cases, which we’ll cover later). Pricing-wise, Savings Plan rates are typically on par with equivalent RIs (Compute SP discounts ~ Convertible RI, EC2 SP ~ Standard RI) . Notably, Savings Plan discount rates do not change with the size of your commitment – committing $10/hour vs $100/hour yields the same per-unit discount percentage , whereas with RIs larger deployments just mean buying more RIs at the same rate.
To illustrate, AWS documentation provides a comparison: Compute Savings Plans offer up to 66% off On-Demand (similar to Convertible RIs) and apply across any compute usage, while EC2 Instance Savings Plans offer up to 72% off (like Standard RIs) but within a specific instance family/region. Both types of Savings Plans lack the capacity guarantee of zonal RIs but make up for it with flexibility and automatic coverage. Also, Savings Plans never apply to Spot Instances or workloads already covered by RIs – they only kick in for normal On-Demand usage after RIs have been applied.
Which to choose? These days, Savings Plans are often the preferred choice for compute savings due to their flexibility. They effectively supersede EC2 Reserved Instances for many use cases. However, if you need capacity reservations or have non-compute services (like RDS or ElastiCache) that Savings Plans don’t cover, RIs still play a role. In many scenarios, a mix can be used: e.g., use Savings Plans for general compute across EC2/Lambda/Fargate, and use RIs for RDS or specific capacity needs. The good news is AWS Cost Explorer’s recommendations and analysis tools (discussed below) can help decide the optimal blend.
For additional details on how Reserved Instances can fit into your overall strategy, you can read more in our Reserved Instances blog post.
Which services are eligible for Savings Plans?
Savings Plans apply to specific AWS services, primarily focused on compute. The coverage includes the following:
- Amazon EC2: All EC2 instance usage (on-demand) is eligible for Savings Plans. Compute Savings Plans apply to any EC2 usage regardless of instance type or region. EC2 Instance Savings Plans apply to EC2 usage of a particular family in a specified region.
- AWS Fargate: Compute Savings Plans cover AWS Fargate serverless container compute usage. This means if you’re running ECS or EKS tasks on Fargate, a Compute SP will discount those costs.
- AWS Lambda: Compute Savings Plans also cover AWS Lambda function duration and invocation costs (for supported runtimes). Lambda usage is automatically discounted under a Compute SP commitment, which is great for serverless workloads.
- Amazon SageMaker: SageMaker AI Savings Plans cover Amazon SageMaker instances used for ML workloads. This includes SageMaker notebook instances, training jobs, and inference endpoints on ML instance types. (Compute SP and EC2 SP do not apply to SageMaker; only the SageMaker-specific plan does.)
These four services represent the eligible usage types for Savings Plans. In practical terms, Savings Plans are savings plans for AWS compute usage – EC2 being the primary one, with Lambda and Fargate included via Compute SP, and SageMaker covered by its own plan. Any usage on these services can draw from a Savings Plan commitment. The flip side is that other AWS services are not covered by Savings Plans. For example:
- Amazon RDS (Relational Database Service): There is currently no Savings Plan for RDS; you would use RDS Reserved Instances for long-term discounts on RDS. RDS usage will not be discounted by a compute Savings Plan (since it’s not EC2/Lambda/Fargate/SageMaker).
- Amazon Redshift, ElastiCache, etc.: Similarly, other services with their own RI or reserved capacity offerings are outside the scope of Savings Plans. Savings Plans focus on compute platforms as listed above.
If you’re ever unsure, AWS provides a full list of eligible services here. As of now, the list is limited to EC2, Lambda, Fargate, and SageMaker. Any usage beyond those (like S3, DynamoDB, RDS, etc.) would not utilize a Savings Plan and would require other cost optimization methods.
Understanding AWS Savings Plans Recommendations
To help customers identify potential savings, AWS provides Savings Plans recommendations via the AWS Cost Explorer. These recommendations analyze your past usage to suggest an optimal Savings Plan purchase. In other words, AWS tries to answer: Given your recent usage, which Savings Plan (and how much commitment) would save you the most money?
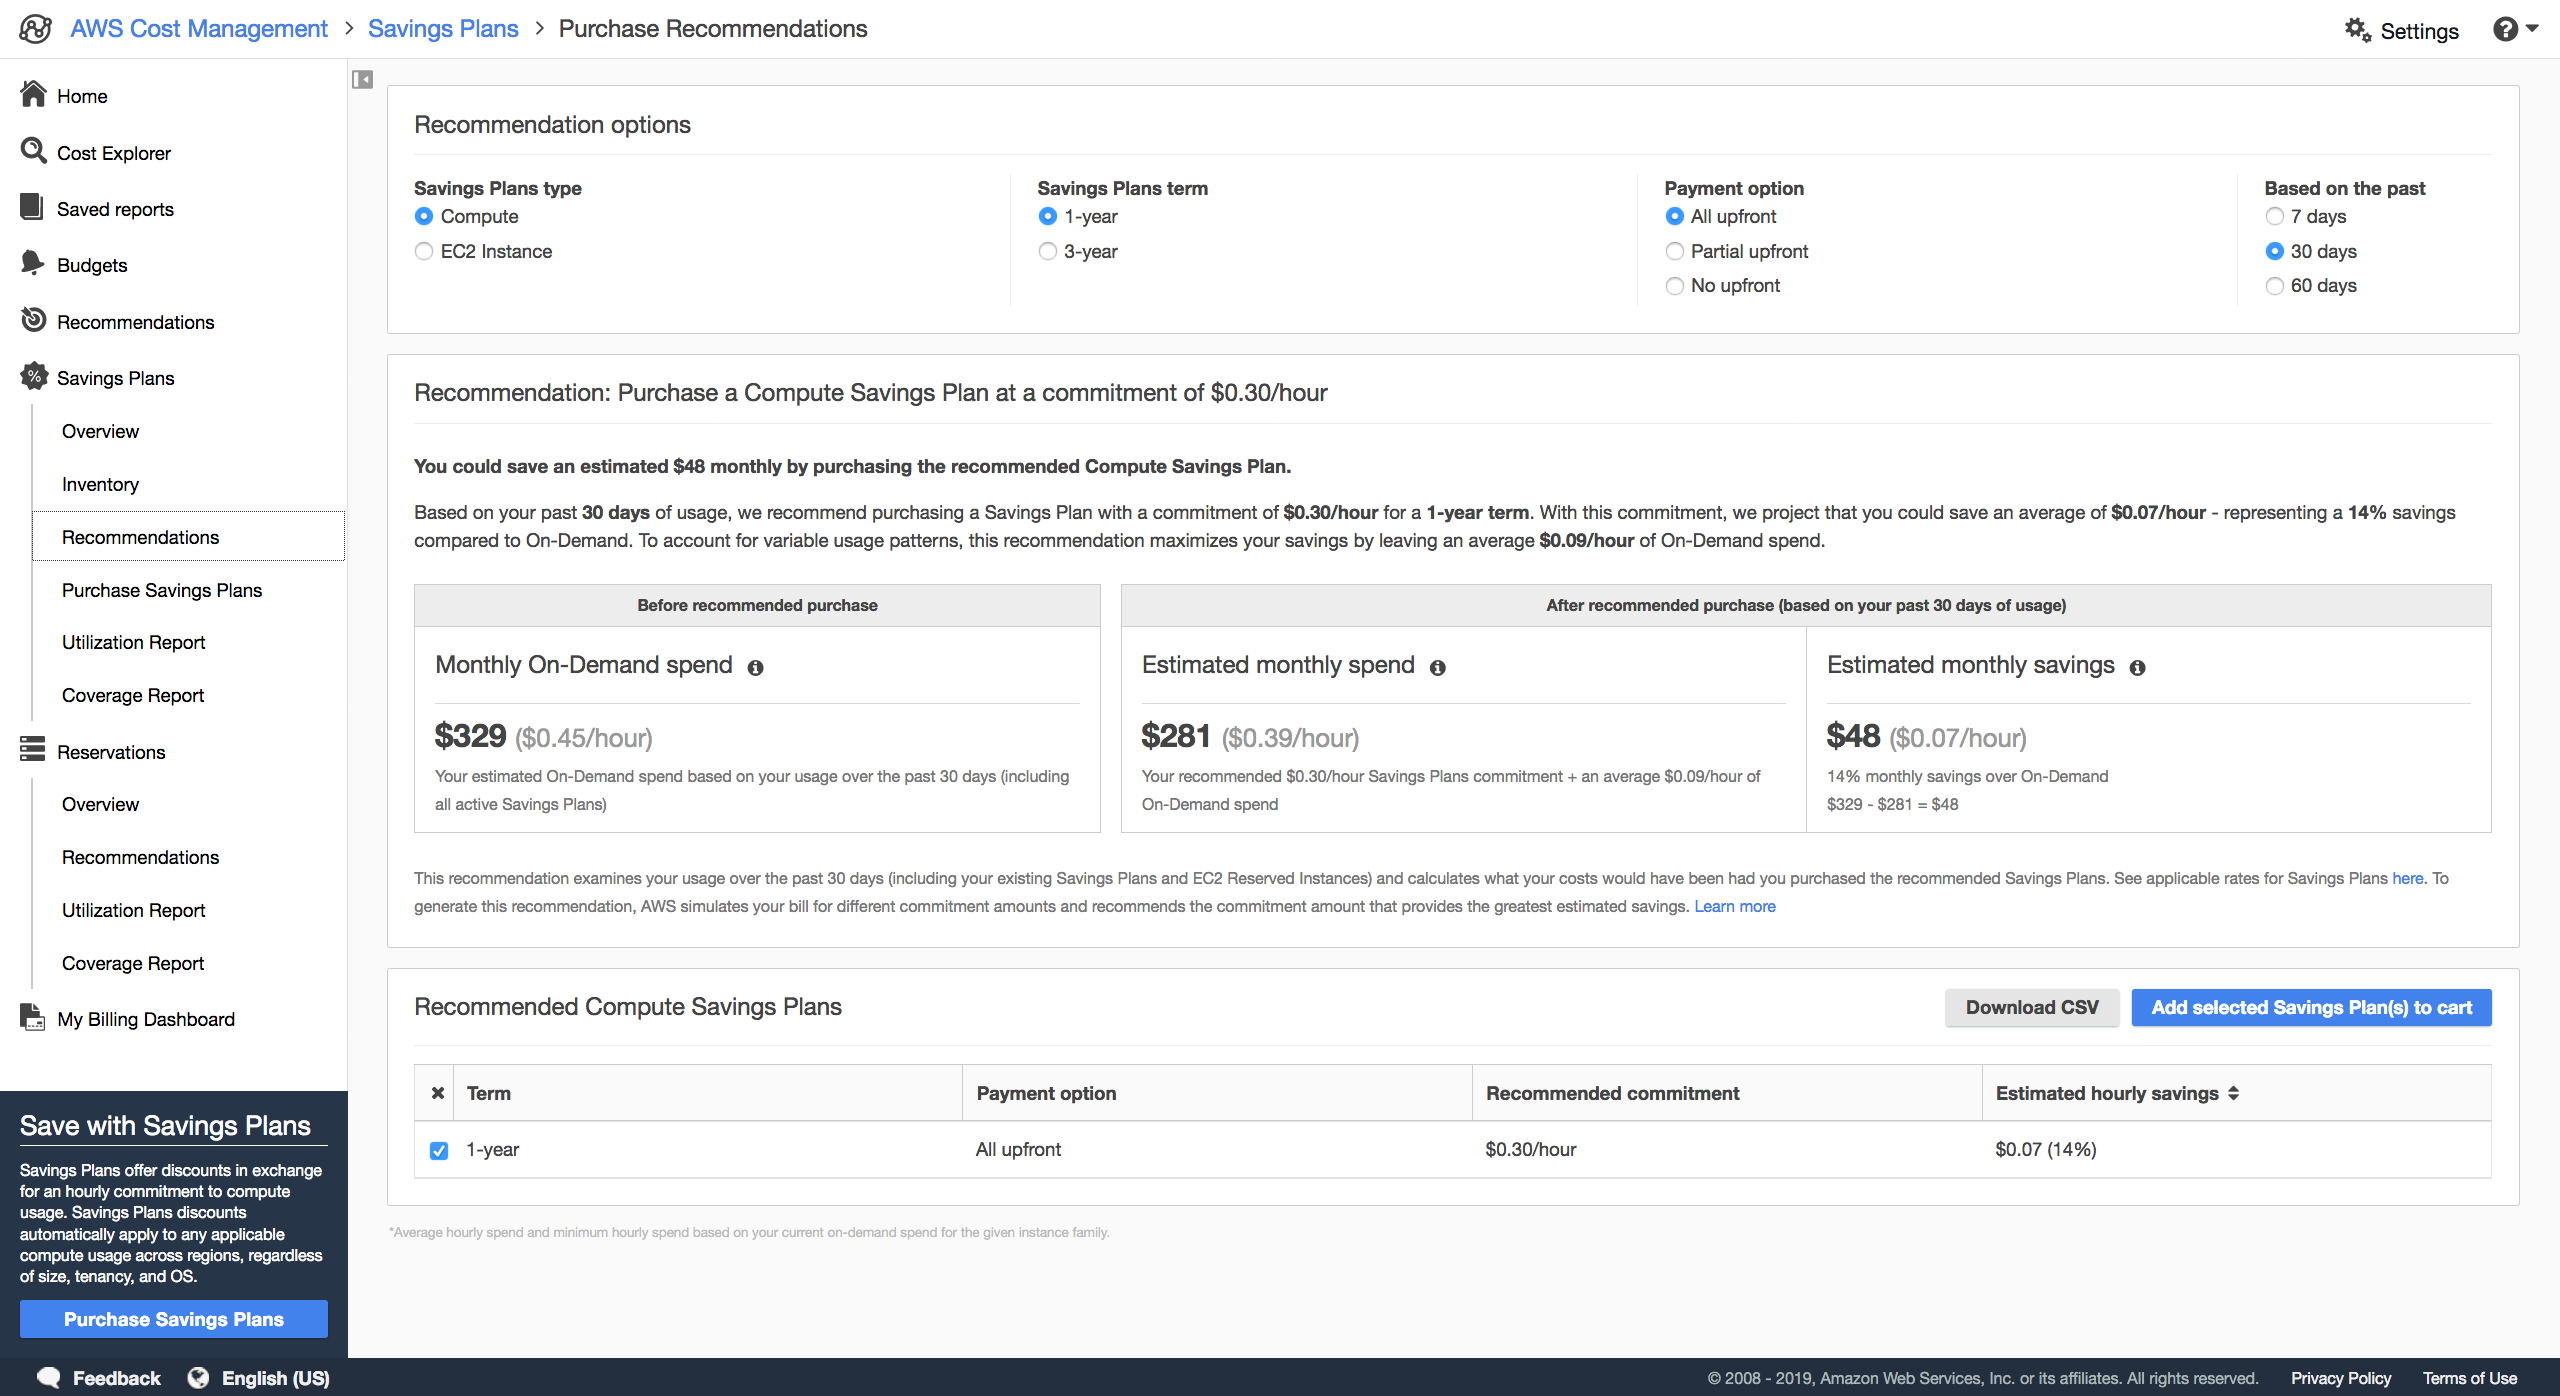
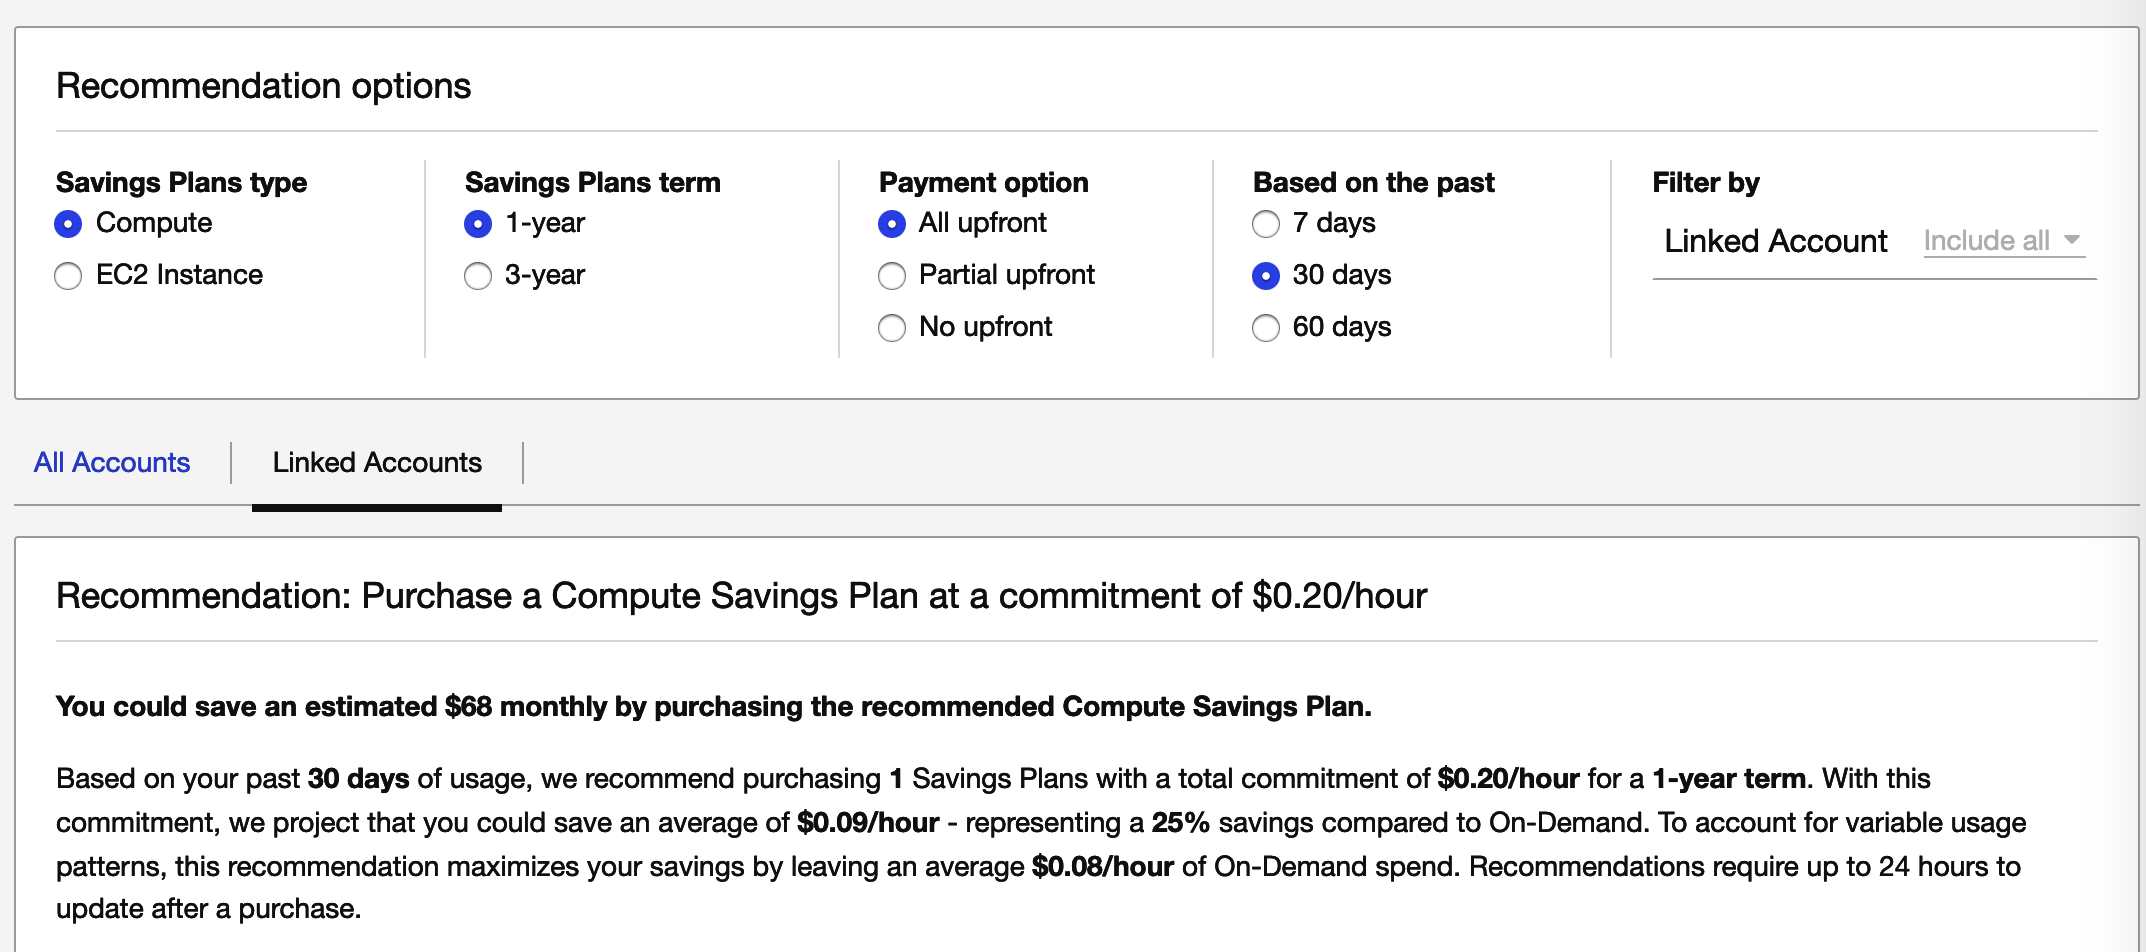
How it works: AWS looks at your historical On-Demand usage (by default over the past 7, 30, or 60 days) and calculates what your bill would have been with a certain Savings Plan. It then finds the commitment that would yield the largest savings for that period. The recommendation includes key summary metrics:
- Monthly On-Demand Spend: How much you are paying per month on On-Demand currently (for the analyzed period), including the effect of any existing Savings Plans you already have.
- Estimated Monthly Spend with Plan: What your projected monthly spend would be if you purchase the recommended Savings Plan, combining the committed rate plus any remaining On-Demand usage not covered by the plan.
- Estimated Monthly Savings: The difference between the above – effectively how much less you’d pay per month if you buy the recommended plan. This is the net savings after the plan’s cost.
AWS Cost Explorer generates these recommendations at both the single-account level and (if you use AWS Organizations) at the organization level. From a management (payer) account, you can see a recommendation that considers usage across the whole org (assuming accounts share discounts). Individual member accounts can also get recommendations just for their own usage if needed.
To view your Savings Plans recommendations, you can navigate in the AWS Billing & Cost Management console: Savings Plans > Recommendations. There you’ll find the recommended Savings Plan commitment and term. AWS even allows you to customize the parameters – for example, you might adjust the lookback period or turn off considering existing RIs/SPs to see how recommendations change. You can also refresh the recommendations (AWS allows up to 3 refreshes per day per org ) to get an updated analysis, say after a recent usage change or after purchasing a plan.
Some important things to understand about these recommendations:
- They are not a forecast. Recommendations are based purely on historical usage patterns, assuming they repeat. If you expect your usage to increase or decrease, take that into account. AWS explicitly notes that the recommendations don’t forecast future usage.
- Lookback matters: Ensure you choose a lookback period that reflects typical usage. For example, if the last 7 days were unusually high traffic, a 7-day lookback might suggest a big plan that overshoots normal needs – 30 or 60 days might smooth it out.
- Threshold for recommendations: AWS generates Savings Plan recs only if your account has at least a certain level of On-Demand spend (e.g., ~$0.10/hour on average) in the lookback window. Very low usage might not trigger a recommendation since the savings would be minimal.
- Compute vs EC2 Plan recommendations: AWS provides recommendations for both Compute Savings Plans and EC2 Instance Savings Plans, but they are separate. You could see, for instance, a recommendation for a $10/hour Compute SP and a separate one for a $10/hour EC2 SP. These aren’t meant to be added together; rather, they show two different ways to save. (In practice, many users will pick one approach or the other.)
- Viewing details: You can click into the recommendation to see more details, including how the commitment would be utilized hour-by-hour and which usage would remain on-demand. AWS also provides an API (Cost Explorer API) to fetch recommendations programmatically if you want to integrate this into your own tooling.
In essence, Savings Plans recommendations are like an AWS Savings Plans calculator tailored to your environment. They do the heavy math for you and present a clear “you could save $X per month if you commit to Y”. While extremely useful, always apply your understanding of upcoming projects or changes – the best decision might be to adjust the recommendation or purchase a slightly smaller or larger plan depending on future expectations.
How to decide which Savings Plans to purchase
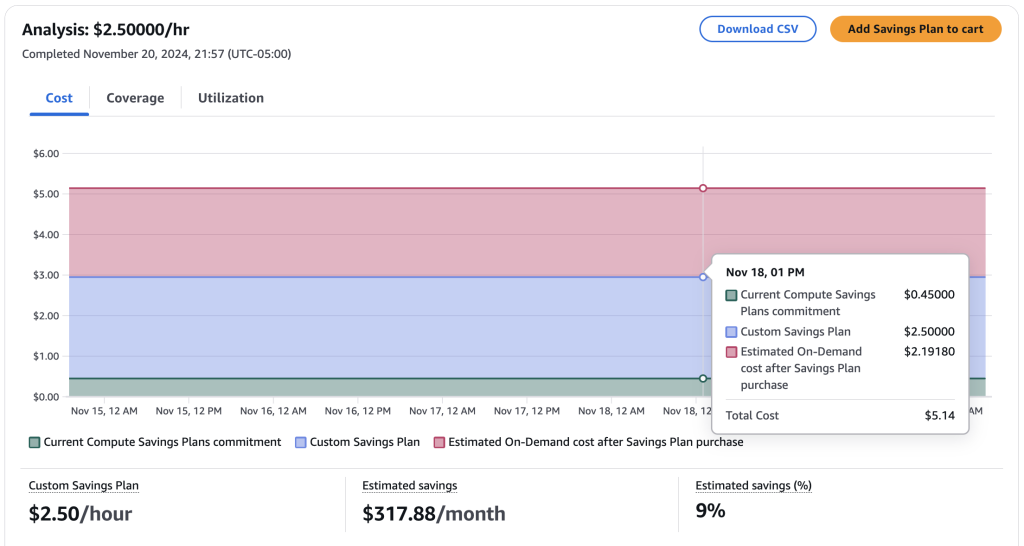
Once you understand your recommendations, the next step is planning what to actually buy. This is where the Savings Plans Purchase Analyzer comes in. AWS introduced Purchase Analyzer to help you evaluate different purchase options before pulling the trigger on a Savings Plan.
Savings Plans Purchase Analyzer is a tool in the AWS Cost Management console that lets you model and compare scenarios for Savings Plans purchases. It is essentially an advanced calculator for savings plans: you can input different commitment amounts or use the recommended amount, choose 1-year vs 3-year, upfront vs no upfront, and see how each scenario would affect your savings, coverage, and utilization.
Using Purchase Analyzer, you can do things like:
- Estimate cost & coverage: See how a potential Savings Plan purchase would impact your monthly costs and what percentage of your usage would be covered by the plan (versus left as On-Demand).
- Model different scenarios: Try out custom commitment amounts, or evaluate the impact of excluding certain usage (for example, if some of your current Savings Plans are expiring soon, you can exclude them to see how a new plan would fill the gap). Adjust the historical period (lookback) to account for trends.
- Compare savings vs. risk: Purchase Analyzer helps compare savings and risk for different commitment levels. A higher commitment yields more savings if usage stays high, but also carries more risk if your usage drops (you’d be over-committed). The tool makes these trade-offs explicit by showing metrics like utilization (what percent of your commitment is actually used) and savings for each scenario.
- Make informed decisions: By iterating through scenarios, you can find a “sweet spot” where you maximize savings while maintaining a comfortable buffer. This leads to more informed purchasing decisions rather than blindly trusting one recommendation.
To access Purchase Analyzer, go to Billing & Cost Management > Savings Plans > Purchase Analyzer in the AWS console. You’ll get an interface to tweak parameters and a report of results.
In practice, you might start with AWS’s recommendation as a baseline in the Purchase Analyzer, then adjust up or down. For example, if AWS recommended a $50/hour Compute Savings Plan, you might test a $40/hour and $60/hour scenario to see the differences in utilization and savings. If $60/hour only adds a tiny bit of extra savings but risks low utilization, you might stick closer to $50 or $45. Conversely, if you expect growth, you might lean higher. The Purchase Analyzer essentially lets you ask “What if?” and get immediate feedback, which is invaluable for deciding which Savings Plan to purchase.
Remember that you can refresh recommendations and run the analyzer multiple times (AWS allows up to 20 Purchase Analyzer runs per account per day ). This encourages iterative planning. Once you’re satisfied with a scenario, you’re ready to purchase.
Understanding your savings opportunities

AWS provides an “Overview” dashboard for Savings Plans that highlights your current plans and any additional savings opportunities you might have. This is a great starting point to ensure you’re not leaving money on the table.
On the Savings Plans > Overview page of the Cost Management console, you will see:
- Your Active Savings Plans: A summary of any Savings Plans you currently own, including their utilization (how fully they are being used) and coverage (how much of your total spend is covered by Savings Plans).
- Additional Savings Opportunities: If you have unused potential for more savings, AWS will show it here. For example, if you still spend a lot on On-Demand in some area, the overview might flag that as an opportunity to purchase a Savings Plan. If you have never purchased a Savings Plan, this section might simply show how Savings Plans work and guide you to consider a purchase.
If you don’t own any Savings Plans yet, the Overview page educates you on the concept and immediately shows recommended plans based on your past usage. It’s essentially saying “here’s how Savings Plans could benefit you.” If you do have Savings Plans, the page shifts to show how well those are performing and whether you could save more.
From the overview, if you see a suggestion, you can click “View recommended savings plans” which will take you to the detailed recommendations page we discussed. This is a quick way to jump into action on any identified opportunity.
In summary, the Savings Plans Overview is your at-a-glance health check. It answers: Am I utilizing my Savings Plans fully, and can I save even more? By regularly checking it, you can catch scenarios like an expired plan or increased usage where you should consider a new Savings Plan purchase. This ties into good cloud financial hygiene – just as you monitor performance metrics, you should monitor cost optimization metrics too.
Tip: AWS also offers to set up budget alerts for Savings Plans (via AWS Budgets). You can create budgets for Savings Plan utilization or coverage, so that if your utilization drops (indicating over-commitment) or your coverage drops (indicating you might need more plans), you get notified. This proactive approach helps in continuously understanding your savings opportunities and acting on them.
How to purchase AWS Savings Plans

Purchasing a Savings Plan is straightforward, and AWS has made it similar to an online shopping experience. Here’s a step-by-step on how to purchase a Savings Plan:
- Access the Savings Plans console: Go to the AWS Billing and Cost Management console, and navigate to Savings Plans > Purchase. You can also start from the Recommendations page (if you want to purchase a recommended plan directly).
- Select Plan Type and Details: If you came via Recommendations, the plan details will be pre-filled (but can be adjusted). Otherwise, you will need to choose the type of Savings Plan (Compute, EC2 Instance, or SageMaker) and specify the parameters:
- Commitment amount (e.g., $10/hour).
- Term (1-year or 3-year).
- Payment option (All upfront, Partial upfront, No upfront).
- (For EC2 Instance SP: the instance family and region of the plan).
- Add to Cart: Yes, AWS uses a cart system for Savings Plans. Once you configure what you want, you add the selection to your Savings Plans cart. This allows you to review before finalizing (and you can add multiple different plans to cart if purchasing more than one at once).
- Review and Purchase: Go to the cart, review the cost (if any upfront) and details. When ready, finalize the purchase. If it’s All Upfront or Partial Upfront, you’ll be charged the upfront portion immediately upon checkout.
- Activation: The Savings Plan becomes active usually within minutes. If you chose the start date as immediate, it starts applying to usage right away. (AWS also allows queuing a Savings Plan purchase to start at a future date , useful if you want a plan to begin when an existing one expires, for example.)
AWS recommends using the Recommendations page to drive the purchase so that you’re picking a plan that matches your needs. You can always tweak the numbers, but starting from a data-driven recommendation is wise. Additionally, as mentioned, leverage the Purchase Analyzer for custom scenarios before you go to the purchase page.
A few additional notes when purchasing:
- Multiple Plans: You can purchase multiple Savings Plans if needed. For instance, you could get a 3-year plan for your baseline steady usage and a 1-year plan for some new project that you’re less certain about. AWS will apply all your active plans in aggregate to cover usage.
- Queuing Purchases: AWS allows you to queue a Savings Plan to take effect in the future. This is handy if you want to schedule a plan to start later (maybe the first of next month or right after a current plan ends). The plan is put in a queue and will automatically activate at the specified time. Queued plans can be canceled before they activate, giving you flexibility if plans change.
- Cancellation/Returns: Generally, Savings Plan purchases are irrevocable commitments. However, AWS has a limited feature to return a Savings Plan under specific conditions: you can cancel a recently purchased plan within 7 days of purchase, up to 10 plans per year . This is meant for correction of mistakes (e.g., you accidentally purchased the wrong amount). After that short window, you’re committed for the term. The returned plans feature is accessible via support; it’s not something you casually use for regular capacity management.
- Purchase via API/CLI: Advanced users can also purchase Savings Plans using the AWS CLI or SDK (using the CreateSavingsPlan API). This might be used in Infrastructure-as-Code or automation scenarios. If you use CloudFormation or Terraform, note that Savings Plans are more of an account setting/purchase, so they’re typically handled outside of those frameworks (or via a CLI script).
Once purchased, your Savings Plan will start applying to your usage, and you can monitor its effect on your bill. The next section covers how to keep an eye on your Savings Plans’ performance.
How to monitor your Savings Plans

Monitoring is crucial to ensure you’re actually reaping the benefits of your Savings Plans. AWS provides several tools to monitor Savings Plans utilization and coverage, primarily through Cost Explorer reports and budgeting tools.
Key aspects to monitor:
- Savings Plans Inventory: In the AWS Cost Management console under Savings Plans, the Inventory page lists all your active (and queued) Savings Plans. Here you can see each plan’s status, term, remaining duration, hourly commitment, and the type (Compute, EC2, etc.). This is essentially a roster of what you have. Regularly reviewing inventory helps you track when plans will expire and if you might need renewals.
- Utilization Report: Utilization measures how much of your committed hourly amount you are actually using. AWS provides a Savings Plans Utilization report that shows, for each plan or in aggregate, what percentage of the commitment was consumed by eligible usage. For example, if you have a $10/hour plan and on average $9/hour of usage was covered, your utilization is 90%. High utilization (close to 100%) means you sized your plan well. Low utilization (e.g., 50-60%) means you’re under-utilizing and paying for commitment you didn’t use. The utilization report can be viewed over time to spot trends – maybe at night utilization dips, or after a workload moved, etc.
- Coverage Report: Coverage is the flip side – it shows what percentage of your total eligible spend was covered by Savings Plans versus On-Demand. The Savings Plans Coverage report tells you, for a given period, how much of your EC2/Lambda/Fargate spend was at Savings Plan rates. For instance, if you spent $100 on EC2 in a day and $80 was charged at Savings Plan rates (covered by your plan) and $20 was on-demand, then your coverage was 80%. If coverage is low and you still have a lot of on-demand spend, that might indicate room to purchase additional Savings Plans.
- Cost Explorer filters: You can also use Cost Explorer with filters to visualize your costs with and without Savings Plans. For example, you can plot a graph of your EC2 spend and overlay the Savings Plan covered amount vs on-demand amount. This helps in understanding how effectively the Savings Plan is reducing your bill each month.
- AWS Budgets for Savings Plans: AWS Budgets allows you to create custom budgets and alerts. Notably, you can create Savings Plans utilization or coverage budgets. For example, set a utilization budget at 90% – if in any month your utilization falls below that, you’ll get an alert. Or set a coverage budget to ensure at least say 70% of your EC2 spend is covered by Savings Plans; if it drops below, alert. These proactive alerts can prompt you to investigate (maybe usage dropped and you need to adjust something, or maybe you purchased too much capacity).
Monitoring answers questions like: Am I using what I paid for? and Did I buy enough to cover my needs? Both are important. Optimally, you want high utilization (no waste) and high coverage (few dollars at on-demand rates). Realistically, there’s a balance: some headroom ensures you don’t go over commitment, but too much unused commitment is wasteful.
AWS recommends monitoring both utilization and coverage as part of cost management best practices . For example, if you see utilization consistently at 50%, you over-committed – you might hold off buying more, or see if some commitment can be reduced in the future. If you see coverage at, say, 50% and you still pay a lot on-demand, that’s a prompt to consider purchasing additional plans to increase coverage (assuming the usage is steady).
Lastly, keep an eye on expiry dates of your plans. When a Savings Plan expires, your coverage will drop and on-demand costs will spike if you don’t replace it. Mark your calendar or use the AWS Personal Health Dashboard which usually gives a notice for expiring RIs/Savings Plans. AWS might also send an email for expiring plans. It’s wise to start evaluating renewal options a month or two before expiration.
In summary, monitoring your Savings Plans involves using Cost Explorer’s inventory, utilization, and coverage reports, plus optional budgets/alerts, to ensure you are fully optimizing your savings over time. It’s an ongoing process – purchase is not “set and forget.” With good monitoring, you can achieve an equilibrium where you maximize savings and minimize waste.
How do Savings Plans apply to your AWS usage?
When you have one or more Savings Plans, AWS automatically applies them to your eligible usage to reduce your costs. But understanding how exactly they apply – especially if you have multiple plans or also have Reserved Instances – can get a bit tricky. Let’s break down the rules for how Savings Plans apply to usage (straight from the AWS documentation):
- RI first, then Savings Plan: If you also own Reserved Instances, the RIs are applied to your EC2 usage first, then Savings Plans cover the remaining usage. Savings Plans only discount usage not already covered by an RI. They do not double-dip or supersede RIs. Essentially, RIs take priority for the specific instances they cover, and then any leftover usage is eligible for Savings Plans discounts.
- Order of applying multiple Plans: If you have more than one Savings Plan, AWS will group all your active plans together and treat it like one big commitment pool. However, there is one nuance: EC2 Instance Savings Plans are applied before Compute Savings Plans. This is because an EC2 Instance SP is more specific (only covers a particular family/region), whereas a Compute SP is broad. By applying the specific one first, AWS ensures it covers what it can, and then the more flexible Compute Plan can cover everything else. In effect, AWS maximizes your savings by using the most restrictive discounts first.
- Account (Consolidated Billing) hierarchy: In an AWS Organization (consolidated billing family), Savings Plans apply to the owner account’s usage first, then to other linked accounts if there’s any remaining capacity, provided you have sharing enabled. So if account A purchased the plan, account A’s usage is discounted before account B’s, etc. (This is similar to RI sharing rules).
- Maximizing savings order: AWS sorts your eligible usage to apply Savings Plans in a way that maximizes savings. They calculate the potential savings percentage for each piece of usage and apply your plans to the highest savings percentage first. For example, suppose one instance type has a 40% Savings Plan discount and another has 20%. AWS will use your Savings Plan commitment on the 40% one first (because that yields more dollar savings per hour). If multiple usage types have the same savings percentage, they then apply to the one with the lowest absolute Savings Plan rate first (which usually correlates with smaller instance sizes). This algorithm ensures you get the most value out of your plan.
- Exhausting the commitment: The Savings Plan will continue to cover usage (in that order of priority) until your entire committed hourly amount is used up. Any usage beyond that commitment simply runs at normal On-Demand rates. There’s no partial discount beyond your commitment – once it’s exhausted, you pay full price for any additional usage in that hour.
Let’s illustrate with a simple example scenario: Say you have a $50/hour Compute Savings Plan. In a particular hour, you run a variety of instances and Lambda functions that, at on-demand rates, would cost $60. AWS will apply your $50 of Savings Plan across those resources. If some of those resources would get a higher percentage discount (like an expensive Windows instance might have a big difference between on-demand and SP rate), the plan covers those first. When your $50 commitment is fully allocated, the remaining $10 of usage is charged on-demand. If in the next hour your usage drops to $40 on-demand worth, then your $50 commitment simply covers it all (you effectively paid $50 but only used $40 – meaning you had $10 of unused commitment, which is the utilization concern we monitor).
The key takeaway is that Savings Plans seamlessly apply in the optimal way to minimize your costs, without you having to micromanage which instance to apply it to. The mechanism is different from RIs (which apply to specific instances they match), but the end goal is the same – consistent discounts on your bill.
Important: Savings Plans do not cover Spot Instances and they won’t cover any usage that an RI has already covered . They also don’t apply to usage in services not eligible (as discussed earlier). Within their domain, though, they will always try to fully utilize the commitment to your greatest advantage each hour.
Automating Savings Plans with Amazon EventBridge

A lesser-known but powerful feature is the ability to react to Savings Plans events in real time using Amazon EventBridge (formerly CloudWatch Events). AWS emits events for certain Savings Plans lifecycle changes, which means you can set up automation – for example, trigger a notification or workflow when a Savings Plan is about to expire or when a purchase is successful.
EventBridge Integration: Savings Plans integrates with EventBridge by emitting events to the "aws.savingsplans" event source in your account. There are two primary types of events:
- State Change events: These occur when a Savings Plan changes state, such as from payment-pending to active, or from active to retired (expired) . Essentially, whenever a plan transitions status (queued -> payment-pending, payment-pending -> active, active -> retired, etc.), an event is published.
- State Change Alert events: These are advance warnings for upcoming state changes, typically 1 or 7 days before a Savings Plan will transition to a new state. For example, a “Savings Plan Expiring in 7 days” event, or an alert that a queued purchase will kick in tomorrow.
Using EventBridge Rules, you can match on these event types and take actions. Some use cases and examples include:
- Notification on Activation: When a new Savings Plan becomes active (perhaps after a purchase or after being in payment-pending), you could trigger an Amazon SNS notification to inform your finance team that the plan is now active. This could be as simple as an email or Slack notification.
- Alert on Payment Failure: If a scheduled Savings Plan purchase fails (maybe due to hitting a limit or payment issue, leading to a payment-failed state), an EventBridge rule can catch that and, for instance, invoke a Lambda function to create an OpsItem or alert an admin. This ensures you don’t miss that a supposed cost-saving measure didn’t go through.
- Renewal Workflow: When a Savings Plan is 7 days from retired (expiration), you get an alert event. You could use this to trigger a workflow – perhaps a Step Functions state machine or a Lambda – to automatically analyze current usage and even purchase a new Savings Plan (via API) to replace the expiring one. Fully automated cost optimization!
- Custom Logging or Tracking: You might forward events to a Kinesis Data Stream or an SQS queue for logging purposes. For example, push all events to a stream that your analytics system consumes, to keep a record of all plan state changes in a database or to generate audit reports.
- Run Command automation: An EventBridge rule could even trigger an EC2 Systems Manager Run Command or other remediation action. Though for Savings Plans, the more common actions are notifications or Lambda functions.
A state change event includes fields like the Savings Plan ARN, the previous state and new state, and a message (e.g., "PaymentSuccessful" when going to active). You can filter on these in your EventBridge rule pattern. For instance, a rule for "detail-type": "Savings Plans State Change", "detail.currentState": ["retired"] could catch when plans expire.

Setting this up involves going to the EventBridge console (or using CloudFormation/Terraform to define rules) and creating a rule on the Savings Plans event bus. The AWS documentation on Automating Savings Plans with EventBridge provides these details and example JSON events to reference.
In summary, EventBridge integration lets you achieve hands-free management for Savings Plans to a degree. While most organizations might simply rely on periodic human checks (via the console or reports), those with advanced automation can ensure nothing slips through the cracks by programmatically responding to events. For example, you’ll never forget to renew a plan because a Lambda function could handle it after analyzing current needs – truly set and forget!
If you’re interested in learning more about how EventBridge works and how to use it effectively across AWS services, check out our blog post on Amazon EventBridge.
Managing access to Savings Plans (IAM considerations)
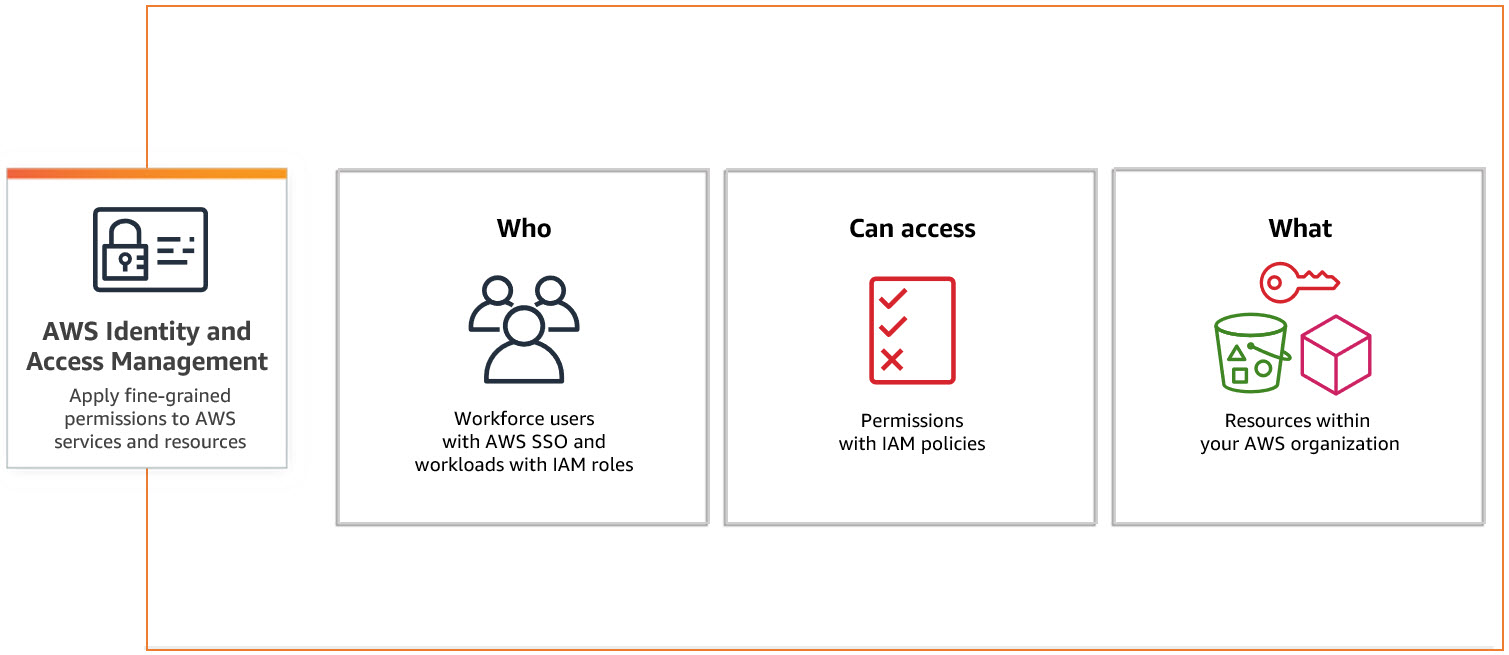
Like any AWS resource, access to Savings Plans needs to be managed through AWS Identity and Access Management (IAM). By default, regular IAM users cannot view or purchase Savings Plans unless granted permissions – only the root or IAM roles/users with admin privileges can. So, if you have a finance team or developers who need to work with Savings Plans, you’ll want to set up proper IAM roles and policies.
Key points on Identity and Access Management for Savings Plans:
- No default user access: Out of the box, users have no permissions on Savings Plans resources. Savings Plans lives under the AWS Billing domain, which often requires special permission (often, aws-portal or account root access for billing info). To allow a user to manage Savings Plans, you must explicitly give permissions.
- AWS Managed Policies: AWS provides pre-built IAM policies for Savings Plans. The main ones are:
- AWSSavingsPlansFullAccess: Grants full access to view, purchase, manage Savings Plans . Attaching this to a role allows that role to do everything related to Savings Plans (equivalent to admin for SP).
- AWSSavingsPlansReadOnlyAccess: Grants read-only access to Savings Plans . This is useful for someone who needs to view reports or check coverage, but not make purchases or changes.
- Fine-Grained Actions: If you prefer custom policies, Savings Plans has a set of API actions you can permit or deny. These actions all start with the prefix savingsplans:. For example, savingsplans:DescribeSavingsPlans, savingsplans:PurchaseSavingsPlan, savingsplans:DescribeSavingsPlansCoverage, etc. . You can create an IAM policy that allows specific actions. For instance, you might allow viewing (Describe* actions) but not purchasing (CreateSavingsPlan).
- Resource-Level Permissions: Currently, Savings Plans API actions largely operate at the account level and don’t support resource-level constraints (because a Savings Plan is not tied to a specific resource like an EC2 instance is – it’s an account-level commitment). When writing IAM policies for SP, the resource is typically * or a specific SavingsPlan ARN for certain actions. Check AWS documentation for which actions allow resource ARNs. But generally, one account’s Savings Plan info is only accessible within that account (or management account for org-wide data).
- Delegating to Users via Roles: A common setup is to create an IAM role (e.g., “SavingsPlansManager”) with the FullAccess policy, and then allow certain IAM users or roles (maybe an AWS SSO group or IAM group) to assume that role. This way, highly privileged actions like purchasing a Savings Plan can be controlled and audited more tightly. Not everyone should be buying a 3-year plan on a whim – likely only finance or lead engineers with approval. Using IAM, you ensure only those roles can do it, and those actions are logged (see CloudTrail below).
- Integration with Organizations: If you use AWS Organizations and have a centralized billing account (payer account), you might manage Savings Plans from that central account. In that case, users of that account need the permissions. Linked accounts typically won’t be purchasing Savings Plans (unless you allow them to use their own budgets). So, consider your model: centralized purchases vs. decentralized.
AWS’s documentation on IAM for Savings Plans provides example JSON policies and outlines the elements of policy structure. They remind that, as always, least privilege is the way to go – give only the permissions necessary (e.g., if a user just needs to view coverage reports, the read-only policy is enough).
One more thing: APIs and CLI – if you’re using them, ensure the IAM entity (user or role) has permission for savingsplans:CreateSavingsPlan for purchasing via CLI, or savingsplans:DescribeSavingsPlans to list plans, etc. The AWS Cost Explorer also has some API operations for Savings Plans data (like retrieving recommendations or utilization). These fall under Cost Explorer APIs (ce:GetSavingsPlansCoverage, etc.) which have their own IAM permissions separate from the core Savings Plans API. So, for full coverage, you might need to attach both SavingsPlans and CostExplorer permissions if building custom tooling.
In short, IAM for Savings Plans is about controlling who can view or manage Savings Plans. AWS makes it straightforward with managed policies, and all actions are logged in CloudTrail as we’ll see next. Treat Savings Plans similar to how you treat billing or budgeting access – restrict purchase capabilities to those who understand the financial commitment, and leverage read-only access for stakeholders who just need visibility.
To explore how AWS IAM helps you manage access and permissions securely across services, check out our blog post on AWS Identity and Access Management (IAM).
Logging Savings Plans API calls with AWS CloudTrail
AWS CloudTrail is the service that logs every API call made in your AWS account, providing an audit trail of actions. Savings Plans is fully integrated with CloudTrail, which means any action taken related to Savings Plans is recorded for auditing purposes. This is crucial for accountability, especially since Savings Plans involve financial decisions.
What CloudTrail logs for Savings Plans:
- All API Calls: Whether someone purchases a Savings Plan via the console, CLI, or SDK (CreateSavingsPlan API), or just lists the plans (DescribeSavingsPlans), these calls generate CloudTrail log entries. The CloudTrail event will show who made the call (user, role, AWS service), when, from where (IP address/console), and what the parameters were.
- Console Actions as API calls: Even if you use the AWS Management Console (web UI) to do something with Savings Plans, under the hood that triggers API operations. CloudTrail will capture those as events too. For example, adding a plan to the cart and purchasing it will result in a CreateSavingsPlan event.
- Event details: Each CloudTrail event contains the full details of the request and response (except sensitive data). For Savings Plans, the important fields include the eventName (e.g., CreateSavingsPlan), the userIdentity (who did it), the sourceIPAddress, etc. CloudTrail even logs if the action was done by another AWS service on your behalf (though in Savings Plans’ case, that’s rare).
- Retention and Analysis: By default, you can view the last 90 days of events in the CloudTrail console (Event History). For longer retention or detailed analysis, you should create a Trail to send logs to an S3 bucket . With a trail, you can keep these logs for years, analyze them with Athena, or forward to a SIEM. CloudTrail logs across all regions by default when you create a single trail covering all regions , so you’ll catch Savings Plans events regardless of region (Savings Plans is a global service tied to your account).
- Security and Compliance: CloudTrail logs help in compliance (knowing who made a purchase commitment of maybe hundreds of thousands of dollars is important!). You can determine if a user had the right to do so and if it was an authorized action. CloudTrail’s userIdentity element will show if it was an IAM user, an assumed role, etc., which is vital for audits .
For example, if someone accidentally purchased an extra Savings Plan or made any changes, you can go into CloudTrail and see that event: User X called CreateSavingsPlan on 2025-04-29T10:00:00Z committing to $5/hour for 3 years. If that was not expected, you have an audit trail to follow up. Or if you have automated processes buying or adjusting plans, CloudTrail will log that the IAM role from your automation did it.
AWS documentation notes that all Savings Plans actions are logged by CloudTrail and points to the Savings Plans API reference for details. If needed, you can even integrate CloudTrail with EventBridge to get real-time alerts on certain API calls (similar to above, but at an API level). For instance, an EventBridge rule on CloudTrail events could alert whenever a CreateSavingsPlan or DeleteQueuedSavingsPlan (if such exists) is called, giving you immediate notification of changes.
In summary, CloudTrail ensures transparency and traceability for Savings Plans operations. To leverage it, make sure you have CloudTrail enabled (it is enabled by default for viewing recent events , but for long-term log storage you need to create a trail). Also, consider restricting who can turn off CloudTrail or delete the logs – standard security best practices – so that your audit trail remains intact. With CloudTrail logs at your disposal, you can confidently allow teams to manage Savings Plans, knowing that every action is recorded if you ever need to review it.
Savings Plans quotas and restrictions
AWS Savings Plans, like any service, has some quotas and rules to be aware of. These are limits on certain actions, likely put in place to prevent abuse or accidental overuse. As of the latest AWS documentation, here are the notable quotas and restrictions:
- Recommendation Refresh Limit: You can refresh your Savings Plans recommendations up to 3 times per day per AWS billing family (organization). This means if you hit the refresh button on the Cost Explorer Savings Plans recommendations, you can do so a few times in 24 hours, but no more. (Three is usually plenty; the limit just prevents constant recalculation which is a heavy operation.)
- Savings Plan Returns: AWS allows a maximum of 10 Savings Plans to be returned (canceled) per calendar year per management account, and only if the return is requested within 7 days of purchase (and within the same calendar month of purchase) . In practice, this is the “change of mind” quota – up to 10 plans a year can be backed out shortly after purchase. Each plan must be handled within 7 days of buying it. This is a safety net, not a routine feature.
- Note: The management account that purchased the plan must be the one to return it. You can’t have one account buy and another account return.
- Purchase Analyzer Runs: You can run the Savings Plans Purchase Analyzer up to 20 times per day per account. Each run is an analysis scenario. Typically, you won’t hit this in normal use (you’d probably test a handful of scenarios), but if you script it or iterate heavily, keep the limit in mind.
- Queued Purchases: While not a numbered quota, a restriction to note is that when you queue a Savings Plan purchase for later, you need to ensure your account has the ability to pay for it at execution time (especially if multiple are queued). AWS doesn’t list a specific number of queued plans limit, but prudence suggests not to queue an excessive number of plans without confirming with AWS if any such limit exists.
- API Rate Limits: Though not explicitly in the brief documentation snippet, all AWS APIs have some rate limits. If you automate querying Savings Plans data (like utilization or coverage) or purchasing via API, be mindful of API throttling limits (typically a few calls per second depending on the API). If you exceed them, you might get ThrottlingException errors. AWS can increase certain API quotas on request if needed.
These quotas are generally high enough that typical users won’t notice them. They mainly prevent extreme usage patterns. For instance, refreshing recommendations three times a day is usually more than sufficient (recommendations don’t change drastically within a single day unless your usage pattern changed). And returning up to 10 plans a year is generous for “oops” scenarios but ensures customers can’t abuse returns as a way to effectively have a short-term Savings Plan.
It’s always good to be aware of such limits so you aren’t caught off guard. If you try to do a 4th refresh in a day, AWS will simply not allow it (likely an error message will be shown). Or if you attempt an 11th plan return in a year, support will decline it citing the limit. Planning within these bounds will keep your Savings Plan management running smoothly.
For the latest info, you can check AWS documentation or Service Quotas in the AWS console, as AWS may adjust quotas over time. But as of now, the above are the key Savings Plans quotas and restrictions to keep in mind.
Cloudchipr Commitments — Get Full Value from Every Savings Plan

Before we wrap up, here’s how Cloudchipr helps you put everything from this guide into practice—without the manual effort or fragmented AWS dashboards.
Cloudchipr’s Commitments feature brings day-to-day visibility and control to your long-term cost-saving strategies. It not only simplifies commitment tracking but also gives you more clarity than standard AWS monitoring tools.
- One dashboard, zero guesswork – Real-time tiles show your coverage, utilization, and the FinOps-approved Effective Savings Rate (ESR) for EC2, RDS, Redshift, Lambda, and more. You instantly see what’s covered, what isn’t, and how much money is left on the table.
- FinOps-grade ESR tracking – Cloudchipr calculates ESR for every commitment, so you know whether your AWS Savings Plans (and Reserved Instances) are truly beating On-Demand pricing—not just in theory but in hard dollars.
- Smart alerts & recommendations – Slack / email / Teams notifications flag expiring or under-used RIs and suggest right-sized purchases or exchanges—often unlocking up to 65% additional savings with a click.
- Actionable savings forecast – A “Potential Savings” card projects what you could save this month by following Cloudchipr’s recommendations, keeping teams focused on the highest-impact tweaks.
In short, the Commitments module gives you the ongoing visibility and timely nudges needed to maintain strong coverage, utilization, and ESR—so the savings don’t just look good in theory, but actually show up in your next bill.
Conclusion:
AWS Savings Plans are a powerful tool for reducing cloud costs, offering flexibility that has largely made them the preferred choice over Reserved Instances for compute workloads. In this guide, we’ve covered aws savings plans vs reserved instances, detailed the types like aws compute savings plans and their coverage (EC2, Lambda, Fargate, SageMaker), and walked through everything from aws savings plans recommendations to purchasing, monitoring, and even automating Savings Plan management. We also discussed how Savings Plans apply to usage and how to stay within the quotas and restrictions. With this knowledge, you should feel confident in leveraging Savings Plans to optimize your AWS spending.
In practice, the journey with Savings Plans might go like this: assess your environment with Cost Explorer recommendations (your built-in aws savings plans calculator for savings), decide on the right plan using Purchase Analyzer, make the purchase, and then keep an eye on utilization and coverage. Adjust over time by purchasing additional plans if needed or simply enjoying the savings. And don’t forget the governance aspect – use IAM to control access and CloudTrail to log changes, so your organization treats Savings Plans with the same rigor as any financial instrument.
Tools like Cloudchipr can streamline this entire process—giving you a centralized view, automated recommendations, and proactive alerts that make ongoing Savings Plans management easier and more effective.
By understanding and utilizing AWS Savings Plans fully, you can achieve significant cost efficiency for your EC2 instances, container workloads, and serverless functions, all while maintaining the flexibility to innovate and scale in the cloud. Happy cost optimizing!